Setting up SSL and authentication
This guide explains how to enable ssl and setup authentication.
SSL
This section explain how to setup SSL. SSL is not strictly required for authentication but it is highly recommended. Inmanta uses bearer tokens to authorize users and services. These tokens should be kept private and are visible in plain-text in the request headers without SSL.
SSL: server side
Setting a private key and a public key in the server configuration enables SSL on the server. The two
options to set are server.ssl-cert-file and server.ssl-key-file.
For the autostarted agents and compiler to work, either add the CA cert to the trusted certificates of the system or
set server.ssl-ca-cert-file to the truststore.
[server]
# The ssl certificate used by the server
ssl_cert_file=/etc/inmanta/server.crt
# The private key used by the server, associated with the certificate
ssl_key_file=/etc/inmanta/server.key.open

# The certificate chain that the compiler and agents should use to validate the server certificate
ssl_ca_cert_file=/etc/inmanta/server.chain
# The address at which the compiler and agent should connect.
# Must correspond to the hostname in the ssl certificate
internal_server_address=localhost
SSL: agents and compiler
When using SSL, all remote components connecting to the server need to have SSL enabled as well.
For each of the transport configurations (compiler, agent, rpc client, …) ssl has to be
enabled: agent_rest_transport, cmdline_rest_transport and
compiler_rest_transport.
The client needs to trust the SSL certificate of the server. When a self-signed SSL cert is used on the server,
either add the CA cert to the trusted certificates of the system running the agent or configure the ssl-ca-cert-file option
in the transport configuration.
For example for an agent this is agent_rest_transport.ssl and
agent_rest_transport.ssl-ca-cert-file
Autostarted agents and compiles on the server also use SSL to communicate with the server. This requires either for the server
SSL certificate to be trusted by the OS or by setting server.ssl-ca-cert-file. The server will use
this value to set compiler_rest_transport.ssl-ca-cert-file and
server.ssl-ca-cert-file for the compiler and the agents.
Authentication
Inmanta authentication uses JSON Web Tokens for authentication (bearer token). Inmanta issues tokens for service to service interaction (agent to server, compiler to server, cli to server and 3rd party API interactions). For user interaction through the web-console Inmanta can rely on its built-in authentication provider or on any OpenID Connect (OIDC) compliant identity provider (Microsoft Entra ID, Authentik, Keycloak, Okta, Auth0, …).
Inmanta expects a token of which it can validate the signature. Inmanta can verify both symmetric signatures with HS256 and asymmetric signatures with RSA (RS256). Tokens it signs itself for other processes are always signed using HS256. There are no key distribution issues because the server is both the signing and the validating party.
Setup server auth
The server requests authentication for all API calls (except for the GET /api/v2/health endpoint) when
server.auth is set to true. In that case all other components require a valid token.
Warning
When multiple servers are used in a HA setup, each server requires the same configuration (SSL enabled and private keys).
In the server configuration multiple token providers (issuers) can be configured (See JWT auth configuration). Inmanta requires at
least one issuer with the HS256 algorithm. The server uses this to sign tokens it issues itself. This provider is indicated with
sign set to true. Inmanta issues tokens for compilers the servers runs itself and for autostarted agents. Make sure you set
server.bind-address to 127.0.0.1.
Compilers, cli and agents that are not started by the server itself, require a token in their transport configuration. This
token is configured with the token option in the groups agent_rest_transport,
cmdline_rest_transport and compiler_rest_transport.
A token can be retrieved either with inmanta-cli token create or via the web-console using the tokens tab on
the settings page.
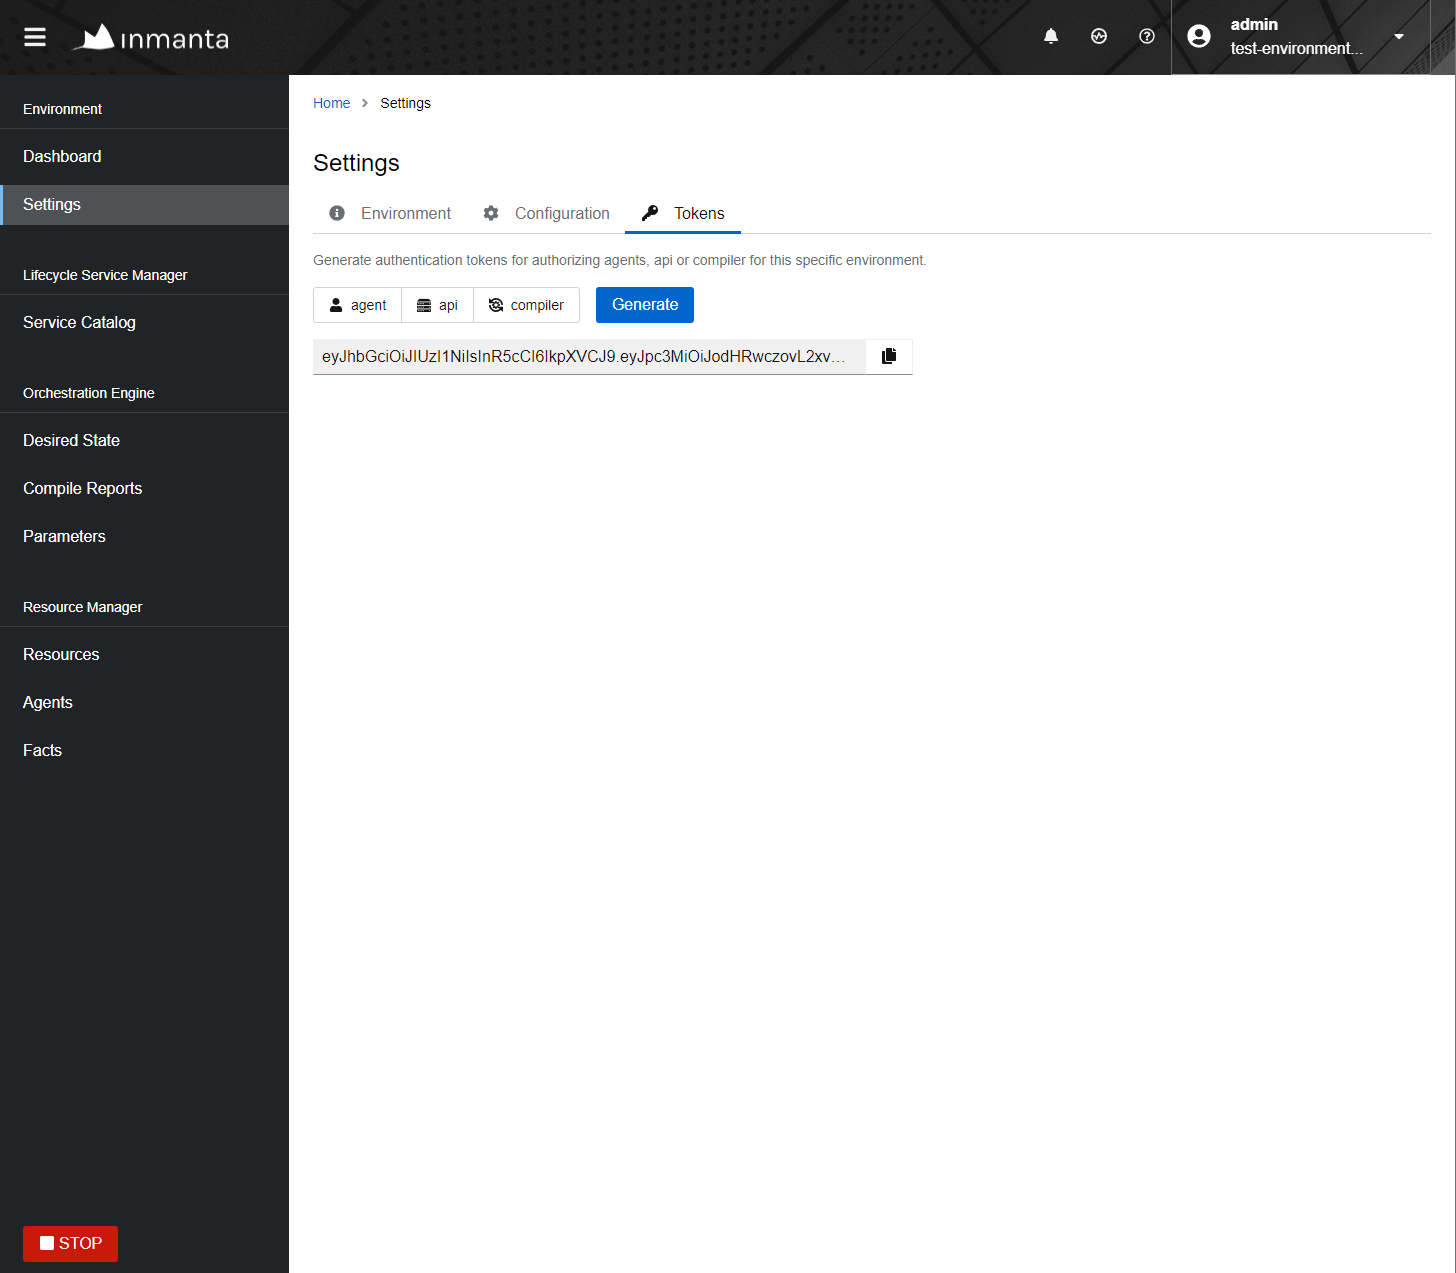
Generating a new token in the web-console.
Setup the built-in authentication provider of the Inmanta server (See Built-in authentication provider) or configure an external issuer
(See External authentication providers) for web-console access to bootstrap access to the create token api call.
When no external issuer is available, or to recover from an identity-provider outage, use the
inmanta-cli token bootstrap command or the web-console local login fallback. Both are described in
Break-glass and recovery access.
Session and token lifetime
Inmanta issues two kinds of tokens with independent lifetimes:
Service tokens (agents, compilers, CLI, and API integrations) expire according to the
expirekey of the signingauth_jwt_*section (see JWT auth configuration). The default,expire=0, means these tokens never expire, which is usually what long-lived agents and integrations require.Web-console login sessions issued by the built-in provider’s
/loginendpoint expire afterserver.login-session-expireseconds. This defaults to3600(one hour) and is independent of the service-tokenexpire. Set it to0to have login sessions follow the signing section’sexpireinstead. When a session expires, the web-console returns the user to the login screen. For external OIDC providers the session lifetime and renewal are governed by the identity provider, not by this option.
Tokens created with inmanta-cli token create or the web-console tokens tab are attributed to the user that
created them through a urn:inmanta:created_by claim. Actions performed with such a token are recorded in the
access log with that attribution (for example token=api created_by=alice env=...) instead of anonymously. When
a token is minted using another already-attributed token, the original creator is carried over.
The built-in provider audits authentication: every successful and failed login is logged with the username and the source address, and credentials (passwords and other parameters marked sensitive) are redacted from debug logs and tracing spans.
JWT auth configuration
The server searches for configuration sections that start with auth_jwt_, after the last _ an id has to be present. This
section expects the following keys:
algorithm: The algorithm used for this key. Only HS256 and RS256 are supported.
sign: Whether the server can use this key to sign JWT it issues. Only one section may have this set to true.
client_types: The client types from the
urn:inmanta:ctclaim that can be validated and/or signed with this key.key: The secret key used by symmetric algorithms such as HS256. Generate the key with a secure prng with minimal length equal to the length of the HMAC (For HS256 == 256). The key should be a urlsafe base64 encoded bytestring without padding. (see below of a command to generate such a key)
expire: The default expire for tokens issued with this key (when sign = true). Use 0 for tokens that do not expire.
issuer: The url of the issuer that should match for tokens to be valid (also used to sign this). The default value is https://localhost:8888/ This value is used to match auth_jwt_* sections configuration with JWT tokens. Make sure this is unique.
audience: The audience for tokens, as per RFC this should match or the token is rejected.
jwks_uri: The uri to the public key information. This is required for algorithm RS256. The keys are loaded the first time a token needs to be verified after a server restart. There is not key refresh mechanism.
jwks_request_timeout: The timeout for the request to the ‘jwks_uri’, in seconds. If not provided, the default value of 30 seconds will be used.
An example configuration is:
[auth_jwt_default]
algorithm=HS256
sign=true
client_types=agent,compiler,api
key=rID3kG4OwGpajIsxnGDhat4UFcMkyFZQc1y3oKQTPRs
expire=0
issuer=https://localhost:8888/
audience=https://localhost:8888/
To generate a secure symmetric key and encode it correctly use the following command:
openssl rand 32 | python3 -c "import sys; import base64; print(base64.urlsafe_b64encode(sys.stdin.buffer.read()).decode().rstrip('='));"
Built-in authentication provider
The Inmanta server has a built-in authentication provider. This provider stores the authentication and authorization information into the PostgreSQL database. As such, there is no need to rely on a 3rd party auth broker. The sections below describe how to enable the built-in authentication provider and how to create the initial admin user. Additional users can then be created via the API or through the web console.
Step 1: Enable authentication
Ensure that the server.auth configuration option is enabled and that the server.auth-method configuration option
is set to database. This means that the /etc/inmanta/inmanta.d/server.cfg file should contains the following:
[server]
auth=true
auth-method=database
...
Step 2: Generate the JWT configuration
Run the /opt/inmanta/bin/inmanta-initial-user-setup command on the orchestrator server.
This command will output a generated JWT configuration if no JWT configuration is already in-place on the server.
$ /opt/inmanta/bin/inmanta-initial-user-setup
This command should be execute locally on the orchestrator you want to configure. Are you running this command locally? [y/N]: y
Server authentication:                            enabled
Server authentication method:                     database
Error: No signing config available in the configuration.
To use a new config, add the following to the configuration in /etc/inmanta/inmanta.d/auth.cfg:

[auth_jwt_default]
algorithm=HS256
sign=true
client_types=agent,compiler,api
key=NYR2LtAsKSs7TuY0D8ZIqmMaLcICC3lf_ur4FGlLUcQ
expire=0
issuer=https://localhost:8888/
audience=https://localhost:8888/

Error: Make sure signing configuration is added to the config. See the documentation for details.
Verify whether the hostname, in the generated configuration section, is correct and put the configuration snippet in the location mentioned in the output of the command.
Step 3: Create the initial user
Re-run the same command again to create the initial user. The password for this new user must be between 12 and 128 characters long and contain at least three of the following four character classes: a lowercase letter, an uppercase letter, a digit, and a special character. The same policy applies to passwords set through the API.
$ /opt/inmanta/bin/inmanta-initial-user-setup
This command should be execute locally on the orchestrator you want to configure. Are you running this command locally? [y/N]: y
Server authentication:                            enabled
Server authentication method:                     database
Authentication signing config:                    found
Trying to connect to DB:                          inmanta (localhost:5432)
Connection to database                            success
What username do you want to use? [admin]:
What password do you want to use?:
User admin:                                       created
Make sure to (re)start the orchestrator to activate all changes.
Step 4: Restart the orchestrator
Now, restart the orchestrator to activate the new configuration.
$ sudo systemctl restart inmanta-server
After the restart of the orchestrator, authentication is enabled on all API endpoints. This also means that the web-console will ask for your credentials.
Scope and limitations
The built-in provider is intended for small, trusted, or edge deployments where direct login is limited to a small number of technical users who already reach the orchestrator through other layers of security (network segmentation, a VPN or reverse proxy, …). It deliberately keeps credential management minimal: passwords must be between 12 and 128 characters long and use at least three of the four character classes (lowercase, uppercase, digit, special), but beyond that the provider does little.
In particular, the built-in provider does not provide:
checks against breached or common-password lists;
password expiry, rotation, reuse history, or a self-service reset / forgot-password flow;
multi-factor authentication (MFA);
login rate limiting, brute-force back-off, or account lockout;
SSO or automated (SCIM) user provisioning.
By design, these controls are expected to come from the layers around the orchestrator rather than from the built-in provider:
Password policy, MFA, SSO, and credential lifecycle: use an external OpenID Connect (OIDC) identity provider (Entra ID, Authentik, Keycloak, Okta, Auth0, …) instead of the built-in provider. Such providers supply these natively. See External authentication providers.
Brute-force protection and rate limiting: place the login and API endpoints behind a reverse proxy, WAF, or network controls that provide rate limiting and back-off - the same edge you should already use before exposing the API. An external IdP additionally moves the interactive login surface off the orchestrator entirely.
Use the built-in provider only where direct login stays limited to a small set of trusted technical users behind such layers; whenever the login endpoint would be exposed more broadly, prefer an external OIDC provider.
External authentication providers
Inmanta supports any OpenID Connect (OIDC) compliant identity provider. The web-console implements the authorization code flow with PKCE via oidc-client-ts. The server validates JWT access tokens signed with RS256 using the provider’s JWKS endpoint.
The provider needs to issue JWT access tokens. A custom urn:inmanta:ct claim is no longer required — when the claim is
absent, the server assumes client type api, which is the correct default for tokens issued to the web-console.
The server setup (a [web-ui] section and an auth_jwt_* block) is identical for all providers and is described in
Generic OIDC configuration. Provider-specific instructions are given afterwards for
Setup for Microsoft Entra ID (Azure AD) and Setup for Authentik.
Migrating from a Keycloak-specific setup
Older versions of the web-console had a Keycloak-specific integration that used the OAuth2 implicit flow via the keycloak-js
library. This is now deprecated. Existing Keycloak deployments should migrate to the generic OIDC provider, which uses the
authorization code flow with PKCE.
To migrate, replace the legacy [web-ui] section:
# Legacy Keycloak-specific configuration (deprecated)
[web-ui]
oidc_realm=inmanta
oidc_auth_url=http://keycloak.example.com:8080
oidc_client_id=inmantaso
With the generic OIDC equivalent:
[web-ui]
oidc_authority=http://keycloak.example.com:8080/realms/inmanta
oidc_client_id=inmantaso
The auth_jwt_* block that validates tokens on the server side does not change — it was already a generic JWT/OIDC block.
On the Keycloak side, reconfigure the client:
Change the client’s Access Type to
public(or equivalent) so no client secret is required.Enable Standard Flow (authorization code). You may disable Implicit Flow.
Ensure PKCE is enabled for the client (
pkce.code.challenge.method=S256in the client attributes).Update Valid Redirect URIs and Web Origins to the web-console’s origin (e.g.
https://orchestrator.example.com).
The urn:inmanta:ct hardcoded claim mapper on the Keycloak client is no longer required and may be removed. The audience
mapper that sets the aud claim to the client id is still required.
Generic OIDC configuration
All OIDC providers require the same two configuration blocks on the orchestrator: a [web-ui] block that tells the web-console
which IdP to redirect to, and an auth_jwt_* block that tells the server how to validate the JWT access tokens issued by that
IdP.
Add the configuration to a file like /etc/inmanta/inmanta.d/oidc.cfg:
[server]
auth=true

[auth_jwt_oidc]
algorithm=RS256
sign=false
client_types=api
issuer=<IdP issuer URL, exactly as it appears in the token iss claim>
audience=<expected aud claim>
jwks_uri=<IdP JWKS URL>
jwt_username_claim=preferred_username

[web-ui]
oidc_authority=<IdP authority URL used by the web-console for discovery>
oidc_client_id=<OAuth2 client id>
# Optional: override the scopes requested by the web-console.
# Default: "openid profile email"
# oidc_scope=openid profile email <resource-scope>
The four unknowns (issuer, audience, jwks_uri, and the oidc_authority) can almost always be found in the IdP’s
OpenID Connect discovery document at <authority>/.well-known/openid-configuration.
On the IdP side, register a new OAuth2 client/application with:
Client type: public / single-page application (PKCE is used instead of a client secret).
Redirect URI: the origin of the web-console (no path), e.g.
https://orchestrator.example.com.Grant type: authorization code (with PKCE).
Note
The jwt_username_claim option tells the server which claim to use for the user’s display name. For most IdPs this
is preferred_username. For IdPs that only issue email, set it to email.
Setup for Microsoft Entra ID (Azure AD)
Step 1: Register the application
In the Azure portal, open Microsoft Entra ID → App registrations → New registration:
Name: e.g.
inmanta-orchestrator.Supported account types: typically “Accounts in this organizational directory only (single tenant)”.
Redirect URI: platform Single-page application (SPA), URI = the origin of the web-console (e.g.
http://localhost:8888for a local test setup orhttps://orchestrator.example.comfor production). Entra ID requires SPA redirect URIs to be either HTTPS or use thelocalhosthostname.
After registration, note the Application (client) ID and Directory (tenant) ID from the Overview blade.
Step 2: Expose an API
Entra ID does not issue JWT access tokens for the default openid profile email scopes — those return an opaque token
intended for Microsoft Graph. To obtain a JWT validated by the orchestrator, the application must expose a scope of its own.
In App registration → Expose an API:
Click Add next to “Application ID URI” and accept the default
api://<client-id>. This URI becomes theaudiencevalue inoidc.cfg.Click Add a scope: name
access, admin display nameAccess Inmanta, admin descriptionAccess the Inmanta orchestrator API, state Enabled.
Step 3: Configure token version and optional claims
By default Entra ID issues v1 access tokens. You can either keep v1 and use the v1 issuer format, or switch to v2 tokens:
v2 tokens (recommended): In App registration → Manifest, set
api.requestedAccessTokenVersionfromnullto2and save. Theissclaim becomeshttps://login.microsoftonline.com/<tenant-id>/v2.0.v1 tokens: Leave the manifest as-is. The
issclaim ishttps://sts.windows.net/<tenant-id>/.
In App registration → Token configuration, add the optional claim preferred_username to the access token so the
web-console can show the user’s name.
Step 4: Configure the orchestrator
Using the values from the Azure portal, fill in oidc.cfg as follows (example for v2 tokens):
[server]
auth=true

[auth_jwt_oidc]
algorithm=RS256
sign=false
client_types=api
issuer=https://login.microsoftonline.com/<tenant-id>/v2.0
audience=api://<client-id>
jwks_uri=https://login.microsoftonline.com/<tenant-id>/discovery/v2.0/keys
jwt_username_claim=preferred_username

[web-ui]
oidc_authority=https://login.microsoftonline.com/<tenant-id>/v2.0
oidc_client_id=<client-id>
oidc_scope=openid profile email api://<client-id>/access
For v1 tokens, replace the issuer with https://sts.windows.net/<tenant-id>/. The jwks_uri is the same in both
cases — keys are served from the v2 discovery endpoint.
Setup for Authentik
Step 1: Create an OAuth2/OpenID provider
In the Authentik admin interface, go to Applications → Providers → Create and pick OAuth2/OpenID Provider.
Name:
Provider for inmanta.Client type: Public (PKCE is used instead of a client secret).
Redirect URIs: list each origin the web-console may be accessed from, one per line, as Strict matches. Include both the value with and without a trailing slash if needed, e.g.:
http://127.0.0.1:8888
http://localhost:8888
Signing key: select an RSA signing key.
Leave the rest at its defaults.
Note the auto-generated Client ID.
Step 2: Link the provider to an application
In Applications → Applications → Create, create an application named inmanta (or similar) and assign it the provider
you just created. The slug you choose for the application becomes part of the issuer URL (e.g.
https://auth.example.com/application/o/inmanta/).
Step 3: Configure the orchestrator
Fetch the discovery document at <authority>/.well-known/openid-configuration to confirm the issuer and jwks_uri, then
fill in oidc.cfg:
[server]
auth=true

[auth_jwt_oidc]
algorithm=RS256
sign=false
client_types=api
issuer=https://auth.example.com/application/o/inmanta/
audience=<client-id>
jwks_uri=https://auth.example.com/application/o/inmanta/jwks/
jwt_username_claim=preferred_username

[web-ui]
oidc_authority=https://auth.example.com/application/o/inmanta/
oidc_client_id=<client-id>
Note
Authentik by default sets the aud claim to the client id. If you customize the audience via a property mapper,
the audience value in oidc.cfg must match whatever appears in the token.
Break-glass and recovery access
If the configured identity provider becomes unavailable or misconfigured, the following recovery paths remain available.
CLI bootstrap token
When run locally on the orchestrator, inmanta-cli token bootstrap mints a token that grants access to
everything. It is valid for 3600 seconds (one hour) and is intended purely for recovery and initial setup.
inmanta-cli token bootstrap
The command signs the token locally, so it requires the signing auth_jwt_* section (sign=true) to be
available in the CLI’s configuration. Because it needs local access to the signing key, it can only be run on the
orchestrator host itself. The resulting token can be used as the token option in a transport configuration or
as a bearer token for direct API calls; it cannot be used to log in to the web-console.
Web-console local login fallback under OIDC
When the web-console is configured for an external OIDC provider, a local database account can be kept as a break-glass login for when the identity provider is unreachable. To enable it:
Provision a database admin user alongside the OIDC configuration with
inmanta-initial-user-setup(this is permitted even whileserver.auth-methodisoidc).Set
oidc_local_fallback=truein the[web-ui]section.
[web-ui]
oidc_authority=<IdP authority URL>
oidc_client_id=<client id>
oidc_local_fallback=true
On a normal load the web-console still redirects to the identity provider. Only when the provider fails does it
offer a local login, and a /login URL is always available for deliberate break-glass access. The fallback is
advertised only when database authentication is actually usable (a signing configuration is present and at least
one local user exists), so it never presents a login form that cannot work.
Reverse proxy with JWT validation
It is also possible to only validate a provided JWT without doing OIDC or any login redirects. For example when using a reverse proxy that sends a JWT such as Cloudflare. In this case we also need a default auth configuration that can sign new tokens as explained in JWT auth configuration. For the external JWT provider we need to add a new authentication section so that it can validate and decode the provided JWT token.
 [auth_jwt_cloudflare]
algorithm=RS256
sign=false
client_types=api
issuer=https://<team>.cloudflareaccess.com
audience=<audience>
jwks_uri=https://<team>.cloudflareaccess.com/cdn-cgi/access/certs
validate_cert=true
jwt_username_claim=email
The example above configures the server to validate Cloudflare ZTNA JWT tokens. Replace <team> with your team name and <audience> which is the audience tag in the ZTNA application.
Some providers do not supply the JWT in the Authorization header but in an alternative header. This can be controlled using the
server.auth-additional-header setting. For cloudflare it needs to be set to Cf-Access-Jwt-Assertion.
In case of an alternative header we expect the plain token and not a bearer token.
[server]
auth_additional_header=Cf-Access-Jwt-Assertion
By default the sub claim is used to indicate the user that is logged in. Cloudflare by default will only provide the email claim. By setting jwt_username_claim to email in the auth section (see the example) you can change the claim that is used for the username. The username is used for example for logging and the username in the web console.