Setting up SSL and authentication#
This guide explains how to enable ssl and setup authentication.
SSL#
This section explain how to setup SSL. SSL is not strictly required for authentication but it is highly recommended. Inmanta uses bearer tokens to authorize users and services. These tokens should be kept private and are visible in plain-text in the request headers without SSL.
SSL: server side#
Setting a private key and a public key in the server configuration enables SSL on the server. The two
options to set are server.ssl-cert-file and server.ssl-key-file.
For the autostarted agents and compiler to work, either add the CA cert to the trusted certificates of the system or
set server.ssl-ca-cert-file to the truststore.
[server]
# The ssl certificate used by the server
ssl_cert_file=/etc/inmanta/server.crt
# The private key used by the server, associated with the certificate
ssl_key_file=/etc/inmanta/server.key.open

# The certificate chain that the compiler and agents should use to validate the server certificate
ssl_ca_cert_file=/etc/inmanta/server.chain
# The address at which the compiler and agent should connect
# Must correspond to hostname the ssl certificate is bound to
server_address=localhost
SSL: agents and compiler#
When using SSL, all remote components connecting to the server need to have SSL enabled as well.
For each of the transport configurations (compiler, agent, rpc client, …) ssl has to be
enabled: agent_rest_transport, cmdline_rest_transport and
compiler_rest_transport.
The client needs to trust the SSL certificate of the server. When a self-signed SSL cert is used on the server,
either add the CA cert to the trusted certificates of the system running the agent or configure the ssl-ca-cert-file option
in the transport configuration.
For example for an agent this is agent_rest_transport.ssl and
agent_rest_transport.ssl-ca-cert-file
Autostarted agents and compiles on the server also use SSL to communicate with the server. This requires either for the server
SSL certificate to be trusted by the OS or by setting server.ssl-ca-cert-file. The server will use
this value to set compiler_rest_transport.ssl-ca-cert-file and
server.ssl-ca-cert-file for the compiler and the agents.
Authentication#
Inmanta authentication uses JSON Web Tokens for authentication (bearer token). Inmanta issues tokens for service to service interaction (agent to server, compiler to server, cli to server and 3rd party API interactions). For user interaction through the web-console Inmanta can rely on its built-in authentication provider or on a 3rd party auth broker. Currently the web-console only supports Keycloak as 3rd party auth broker.
Inmanta expects a token of which it can validate the signature. Inmanta can verify both symmetric signatures with HS256 and asymmetric signatures with RSA (RS256). Tokens it signs itself for other processes are always signed using HS256. There are no key distribution issues because the server is both the signing and the validating party.
The server also provides limited authorization by checking for inmanta specific claims inside the token. All inmanta claims
are prefixed with urn:inmanta:. These claims are:
urn:inmanta:ctA required comma delimited list of client types for which this client is authenticated. Each API call has one or more allowed client types. The list of valid client types (ct) are:agent
compiler
api (cli, web-console, 3rd party service)
urn:inmanta:envAn optional claim. When this claim is present the token is scoped to this inmanta environment. All tokens that the server generates for agents and compilers have this claim present to limit their access to the environment they belong to.
Setup server auth#
The server requests authentication for all API calls when server.auth is set to true. When
authentication is enabled all other components require a valid token.
Warning
When multiple servers are used in a HA setup, each server requires the same configuration (SSL enabled and private keys).
In the server configuration multiple token providers (issuers) can be configured (See JWT auth configuration). Inmanta requires at least one issuer with the HS256 algorithm. The server uses this to sign tokens it issues itself. This provider is indicated with sign set to true. Inmanta issues tokens for compilers the servers runs itself and for autostarted agents.
Compilers, cli and agents that are not started by the server itself, require a token in their transport configuration. This
token is configured with the token option in the groups agent_rest_transport,
cmdline_rest_transport and compiler_rest_transport.
A token can be retrieved either with inmanta-cli token create or via the web-console using the tokens tab on
the settings page.
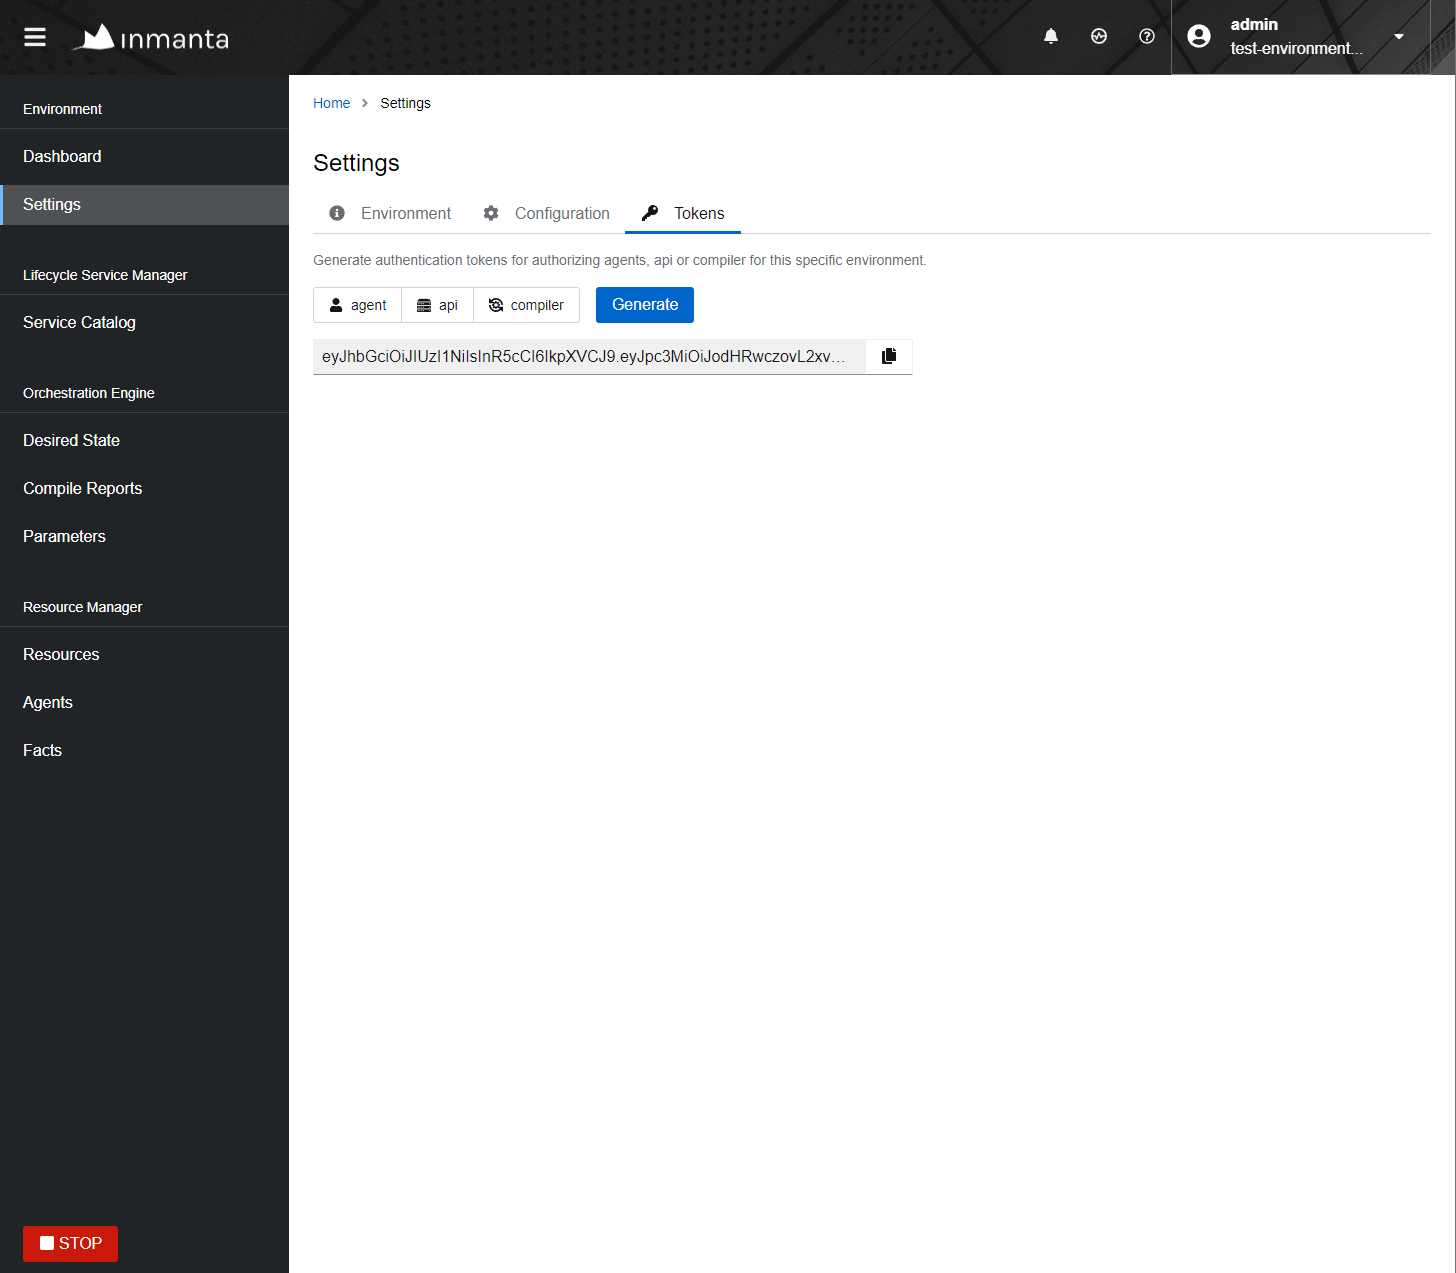
Generating a new token in the web-console.#
Setup the built-in authentication provider of the Inmanta server (See Built-in authentication provider) or configure an external issuer (See External authentication providers) for web-console access to bootstrap access to the create token api call.
When no external issuer is available and web-console access is not required, the inmanta-cli token bootstrap command
can be used to create a token that has access to everything. However, it expires after 3600s for security reasons.
For this command to function, it requires the issuers configuration with sign=true to be available for the cli command.
JWT auth configuration#
The server searches for configuration sections that start with auth_jwt_, after the last _ an id has to be present. This
section expects the following keys:
algorithm: The algorithm used for this key. Only HS256 and RS256 are supported.
sign: Whether the server can use this key to sign JWT it issues. Only one section may have this set to true.
client_types: The client types from the
urn:inmanta:ctclaim that can be validated and/or signed with this key.key: The secret key used by symmetric algorithms such as HS256. Generate the key with a secure prng with minimal length equal to the length of the HMAC (For HS256 == 256). The key should be a urlsafe base64 encoded bytestring without padding. (see below of a command to generate such a key)
expire: The default expire for tokens issued with this key (when sign = true). Use 0 for tokens that do not expire.
issuer: The url of the issuer that should match for tokens to be valid (also used to sign this). The default value is https://localhost:8888/ This value is used to match auth_jwt_* sections configuration with JWT tokens. Make sure this is unique.
audience: The audience for tokens, as per RFC this should match or the token is rejected.
jwks_uri: The uri to the public key information. This is required for algorithm RS256. The keys are loaded the first time a token needs to be verified after a server restart. There is not key refresh mechanism.
jwks_request_timeout: The timeout for the request to the ‘jwks_uri’, in seconds. If not provided, the default value of 30 seconds will be used.
An example configuration is:
[auth_jwt_default]
algorithm=HS256
sign=true
client_types=agent,compiler
key=rID3kG4OwGpajIsxnGDhat4UFcMkyFZQc1y3oKQTPRs
expire=0
issuer=https://localhost:8888/
audience=https://localhost:8888/
To generate a secure symmetric key and encode it correctly use the following command:
openssl rand 32 | python3 -c "import sys; import base64; print(base64.urlsafe_b64encode(sys.stdin.buffer.read()).decode().rstrip('='));"
Built-in authentication provider#
The Inmanta server has a built-in authentication provider. This provider stores the authentication and authorization information into the PostgreSQL database. As such, there is no need to rely on a 3rd party auth broker. The sections below describe how to enable the built-in authentication provider and how to create the initial admin user. Additional users can then be created via the API or through the web console.
Step 1: Enable authentication#
Ensure that the server.auth configuration option is enabled and that the server.auth-method configuration option
is set to database. This means that the /etc/inmanta/inmanta.d/server.cfg file should contains the following:
[server]
auth=true
auth-method=database
...
Step 2: Generate the JWT configuration#
Run the /opt/inmanta/bin/inmanta-initial-user-setup command on the orchestrator server.
This command will output a generated JWT configuration if no JWT configuration is already in-place on the server.
$ /opt/inmanta/bin/inmanta-initial-user-setup
This command should be execute locally on the orchestrator you want to configure. Are you running this command locally? [y/N]: y
Server authentication:                            enabled
Server authentication method:                     database
Error: No signing config available in the configuration.
To use a new config, add the following to the configuration in /etc/inmanta/inmanta.d/auth.cfg:

[auth_jwt_default]
algorithm=HS256
sign=true
client_types=agent,compiler,api
key=NYR2LtAsKSs7TuY0D8ZIqmMaLcICC3lf_ur4FGlLUcQ
expire=0
issuer=https://localhost:8888/
audience=https://localhost:8888/

Error: Make sure signing configuration is added to the config. See the documentation for details.
Verify whether the hostname, in the generated configuration section, is correct and put the configuration snippet in the location mentioned in the output of the command.
Step 3: Create the initial user#
Re-run the same command again to create the initial user. The password for this new user must be at least 8 characters long.
$ /opt/inmanta/bin/inmanta-initial-user-setup
This command should be execute locally on the orchestrator you want to configure. Are you running this command locally? [y/N]: y
Server authentication:                            enabled
Server authentication method:                     database
Authentication signing config:                    found
Trying to connect to DB:                          inmanta (localhost:5432)
Connection to database                            success
What username do you want to use? [admin]:
What password do you want to use?:
User admin:                                       created
Make sure to (re)start the orchestrator to activate all changes.
Step 4: Restart the orchestrator#
Now, restart the orchestrator to activate the new configuration.
$ sudo systemctl restart inmanta-server
After the restart of the orchestrator, authentication is enabled on all API endpoints. This also means that the web-console will ask for your credentials.
External authentication providers#
Inmanta supports all external authentication providers that support JWT tokens with RS256 or HS256. These providers need to
add a claims that indicate the allowed client type (urn:inmanta:ct). Currently, the web-console only has support for keycloak.
However, each provider that can insert custom (private) claims should work. The web-console now relies on the keycloak js library
to implement the OAuth2 implicit flow, required to obtain a JWT.
Tip
All patches to support additional providers such as Auth0 are welcome. Alternatively contact Inmanta NV for custom integration services.
Keycloak configuration#
The web-console has out of the box support for authentication with Keycloak. Install keycloak and create an initial login as described in the Keycloak documentation and login with admin credentials.
This guide was made based on Keycloak 20.0
If inmanta is configured to use SSL, the authentication provider should also use SSL. Otherwise, the web-console will not be able to fetch user information from the authentication provider.
Step 1: Optionally create a new realm#
Create a new realm if you want to use keycloak for other purposes (it is an SSO solution) than Inmanta authentication. Another reason to create a new realm (or not) is that the master realm also provides the credentials to configure keycloak itself.
For example call the realm inmanta
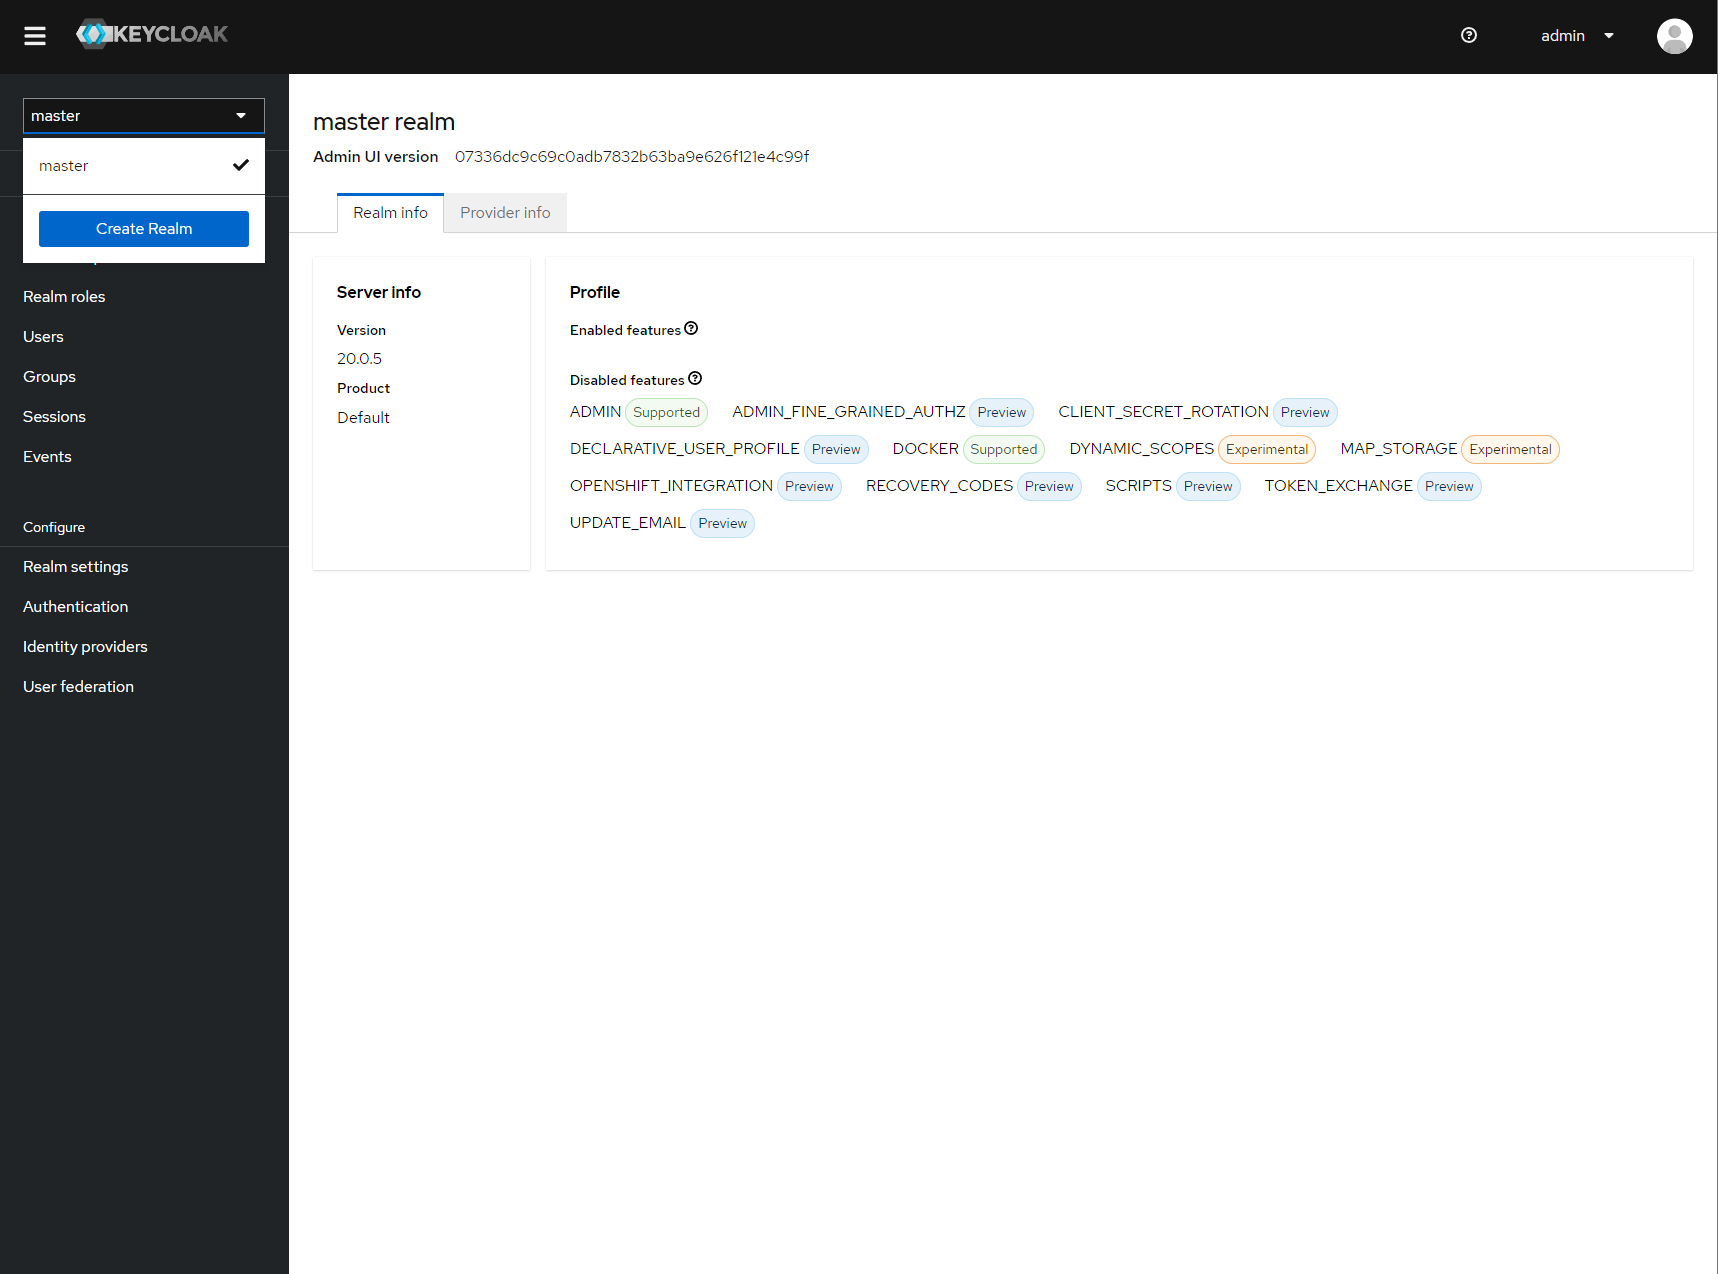
Create a new realm#
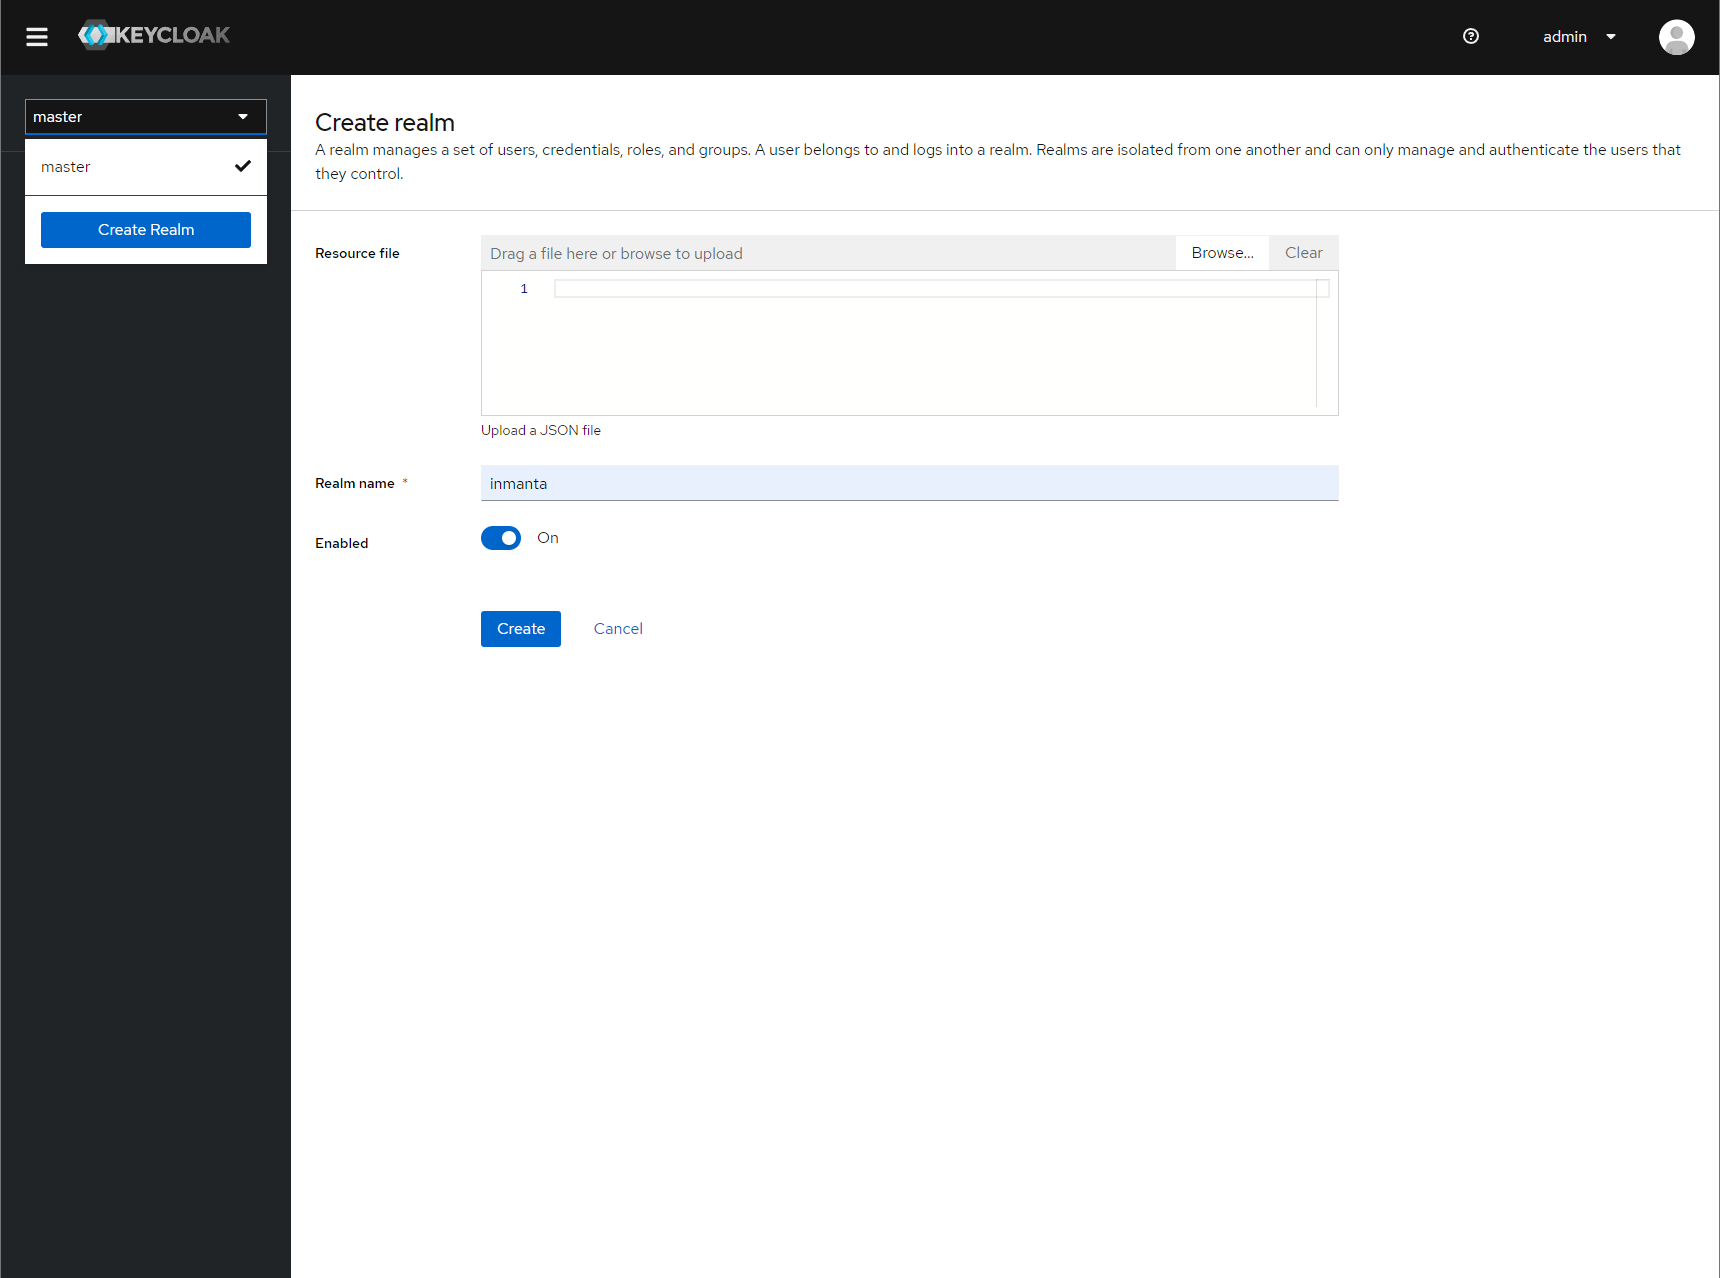
Specify a name for the realm#
Step 2: Add a new client to keycloak#
Make sure the correct realm is active (the name is shown in the realm selection dropdown) to which you want to add a new client.
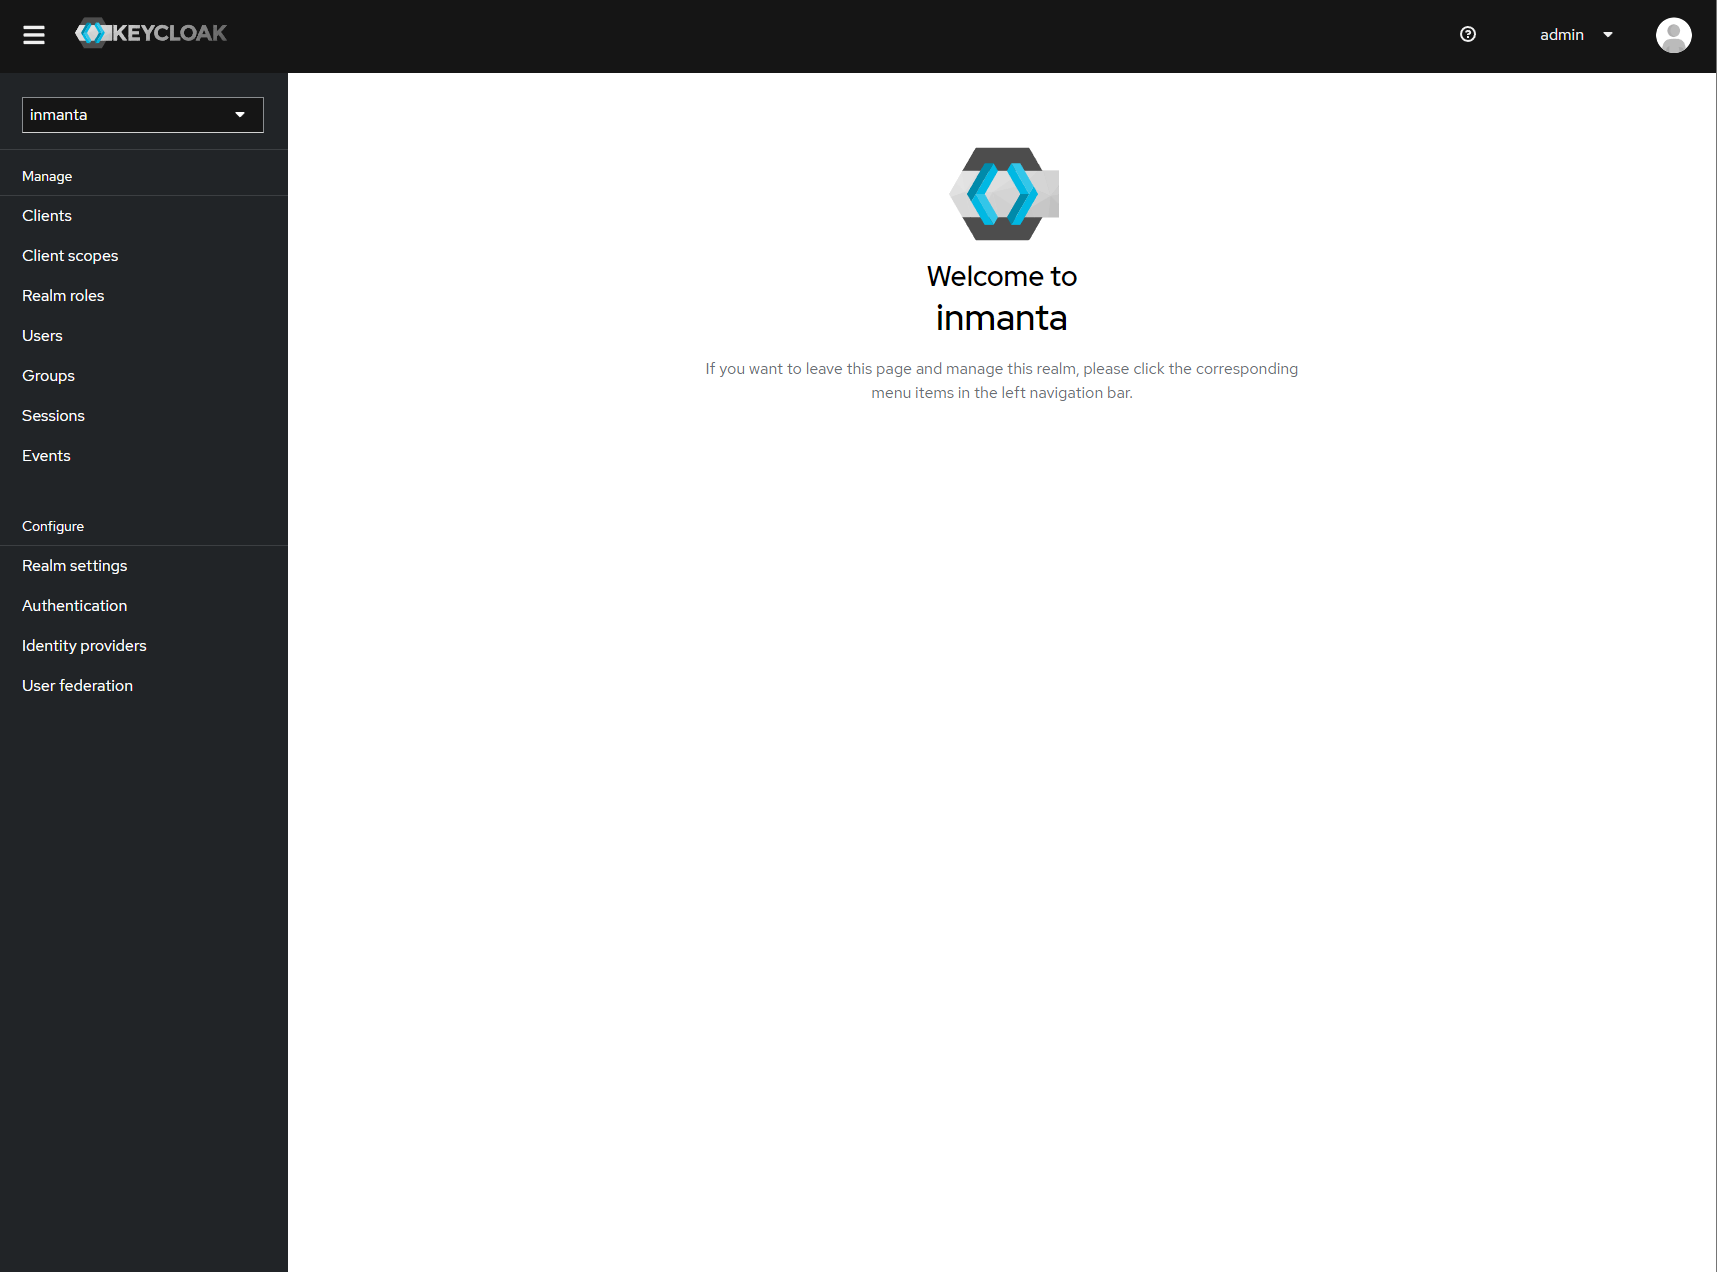
The start page of your newly created realm.#
Go to clients and click create on the right hand side of the screen.
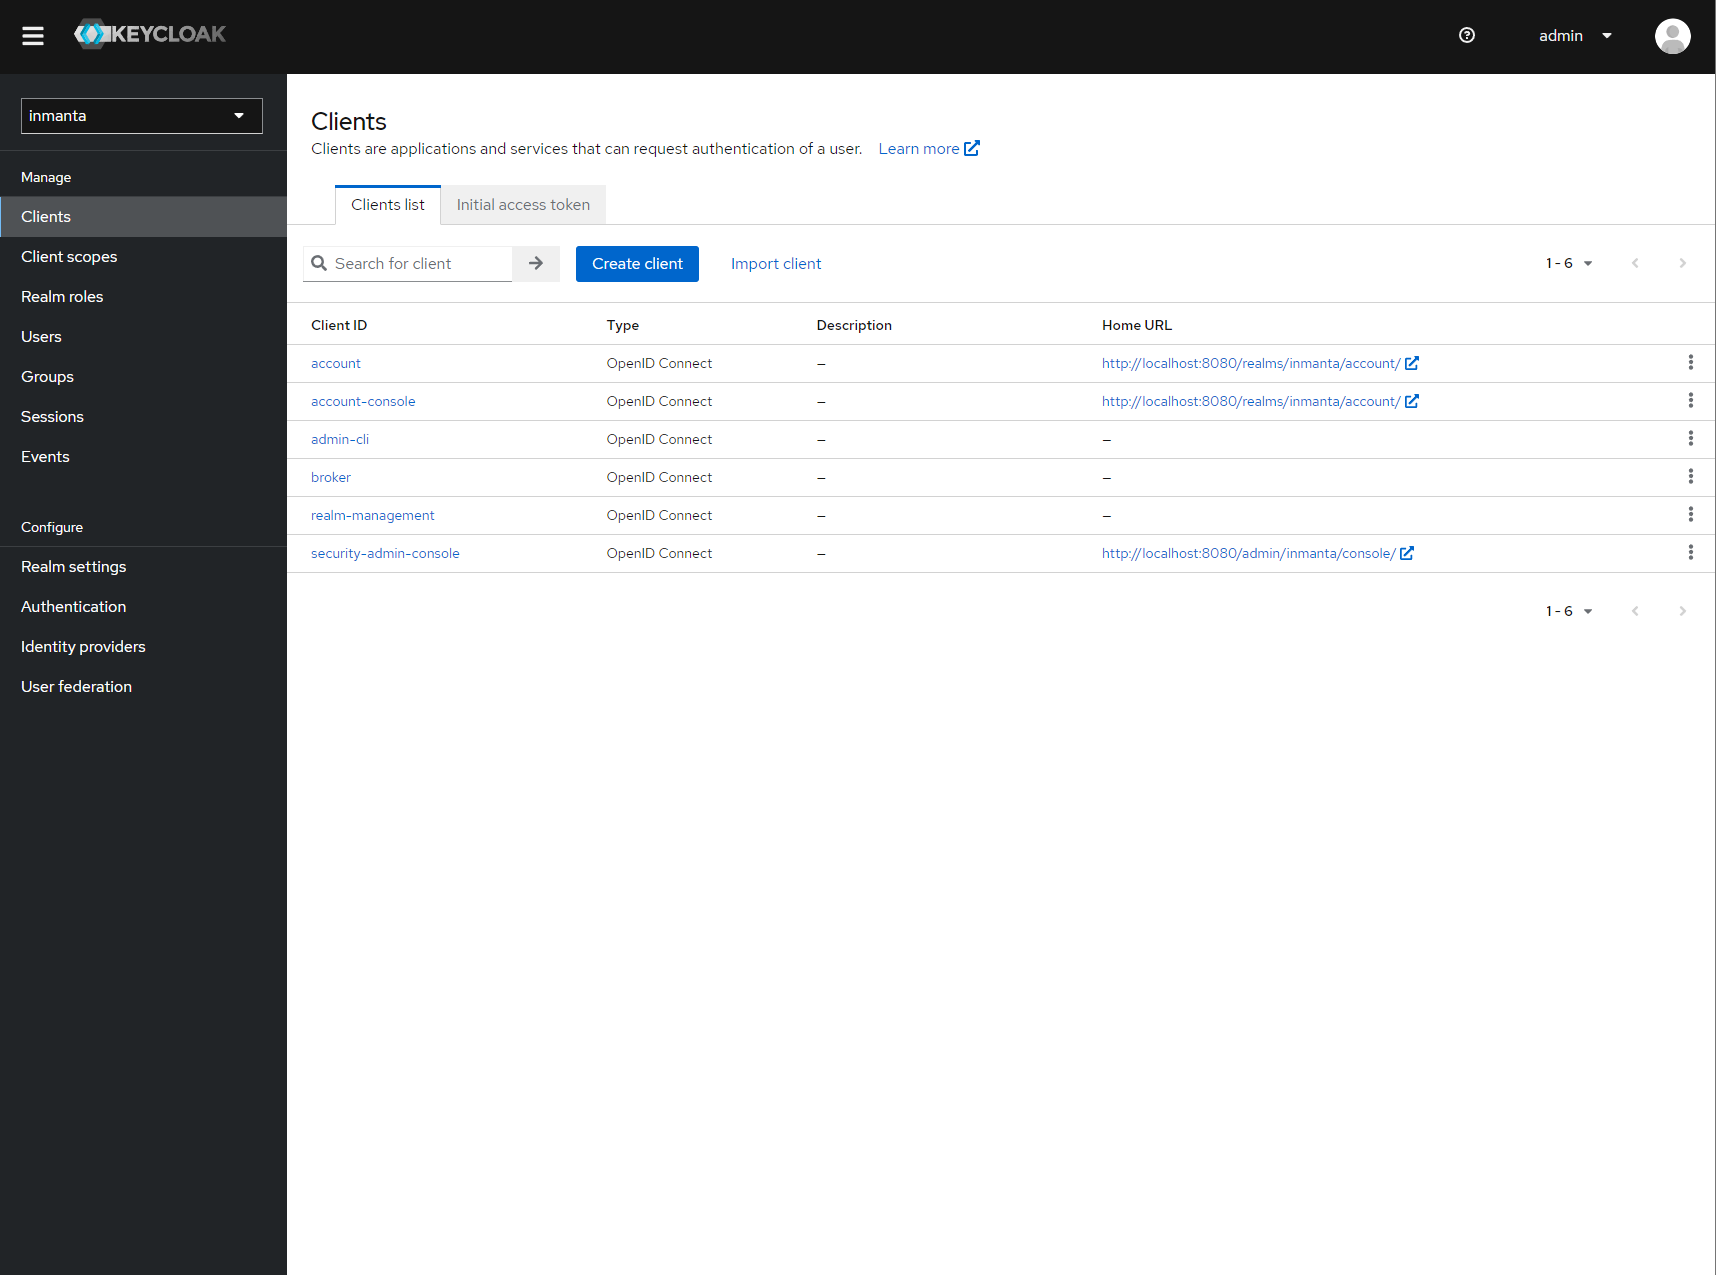
Clients in the master realm. Click the create button to create an inmanta client.#
Provide an id for the client and make sure that the client protocol is openid-connect and click save.
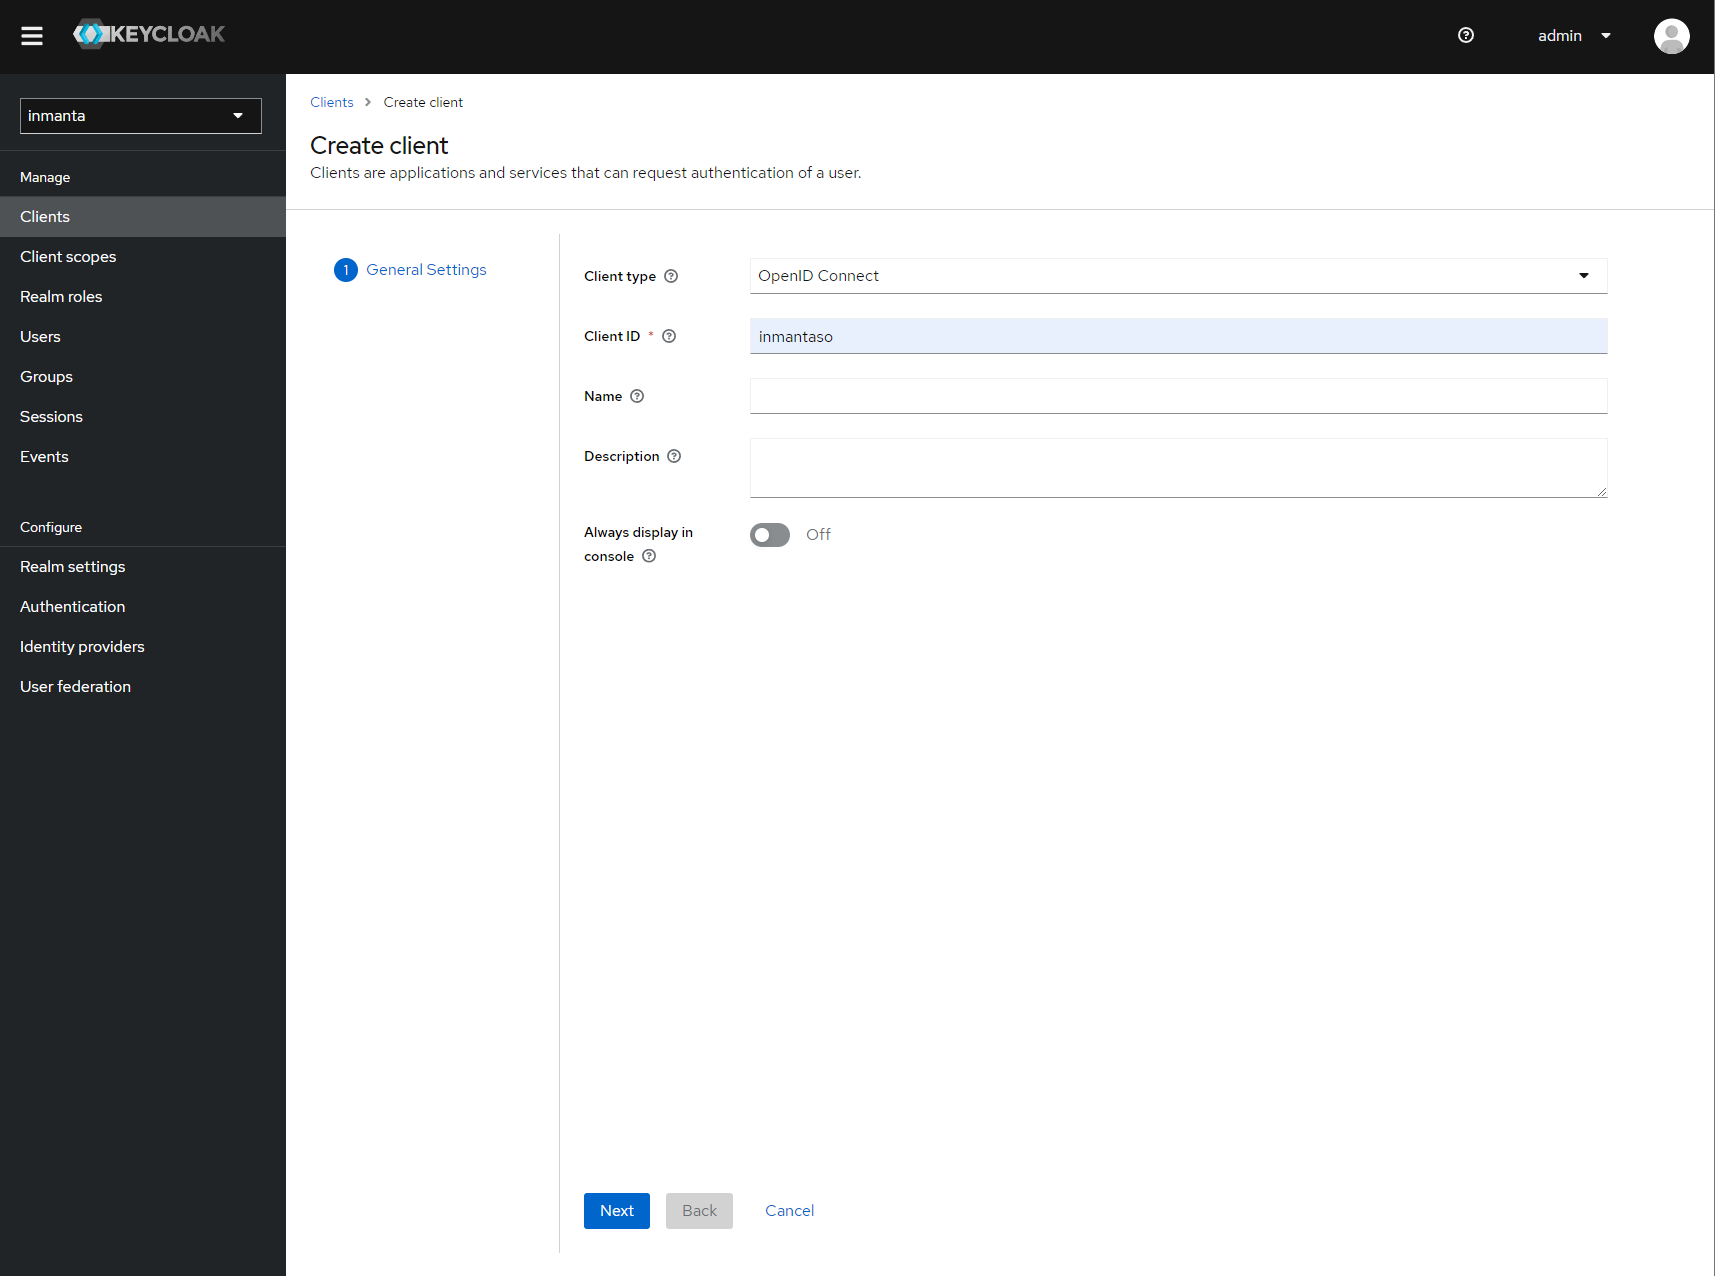
Create client screen#
After clicking save, keycloak opens the configuration of the client. Modify the client to allow implicit flows and add valid redirect URIs and valid post logout redirect URIs. As a best practice, also add the allowed web origins. See the screenshot below as an example.
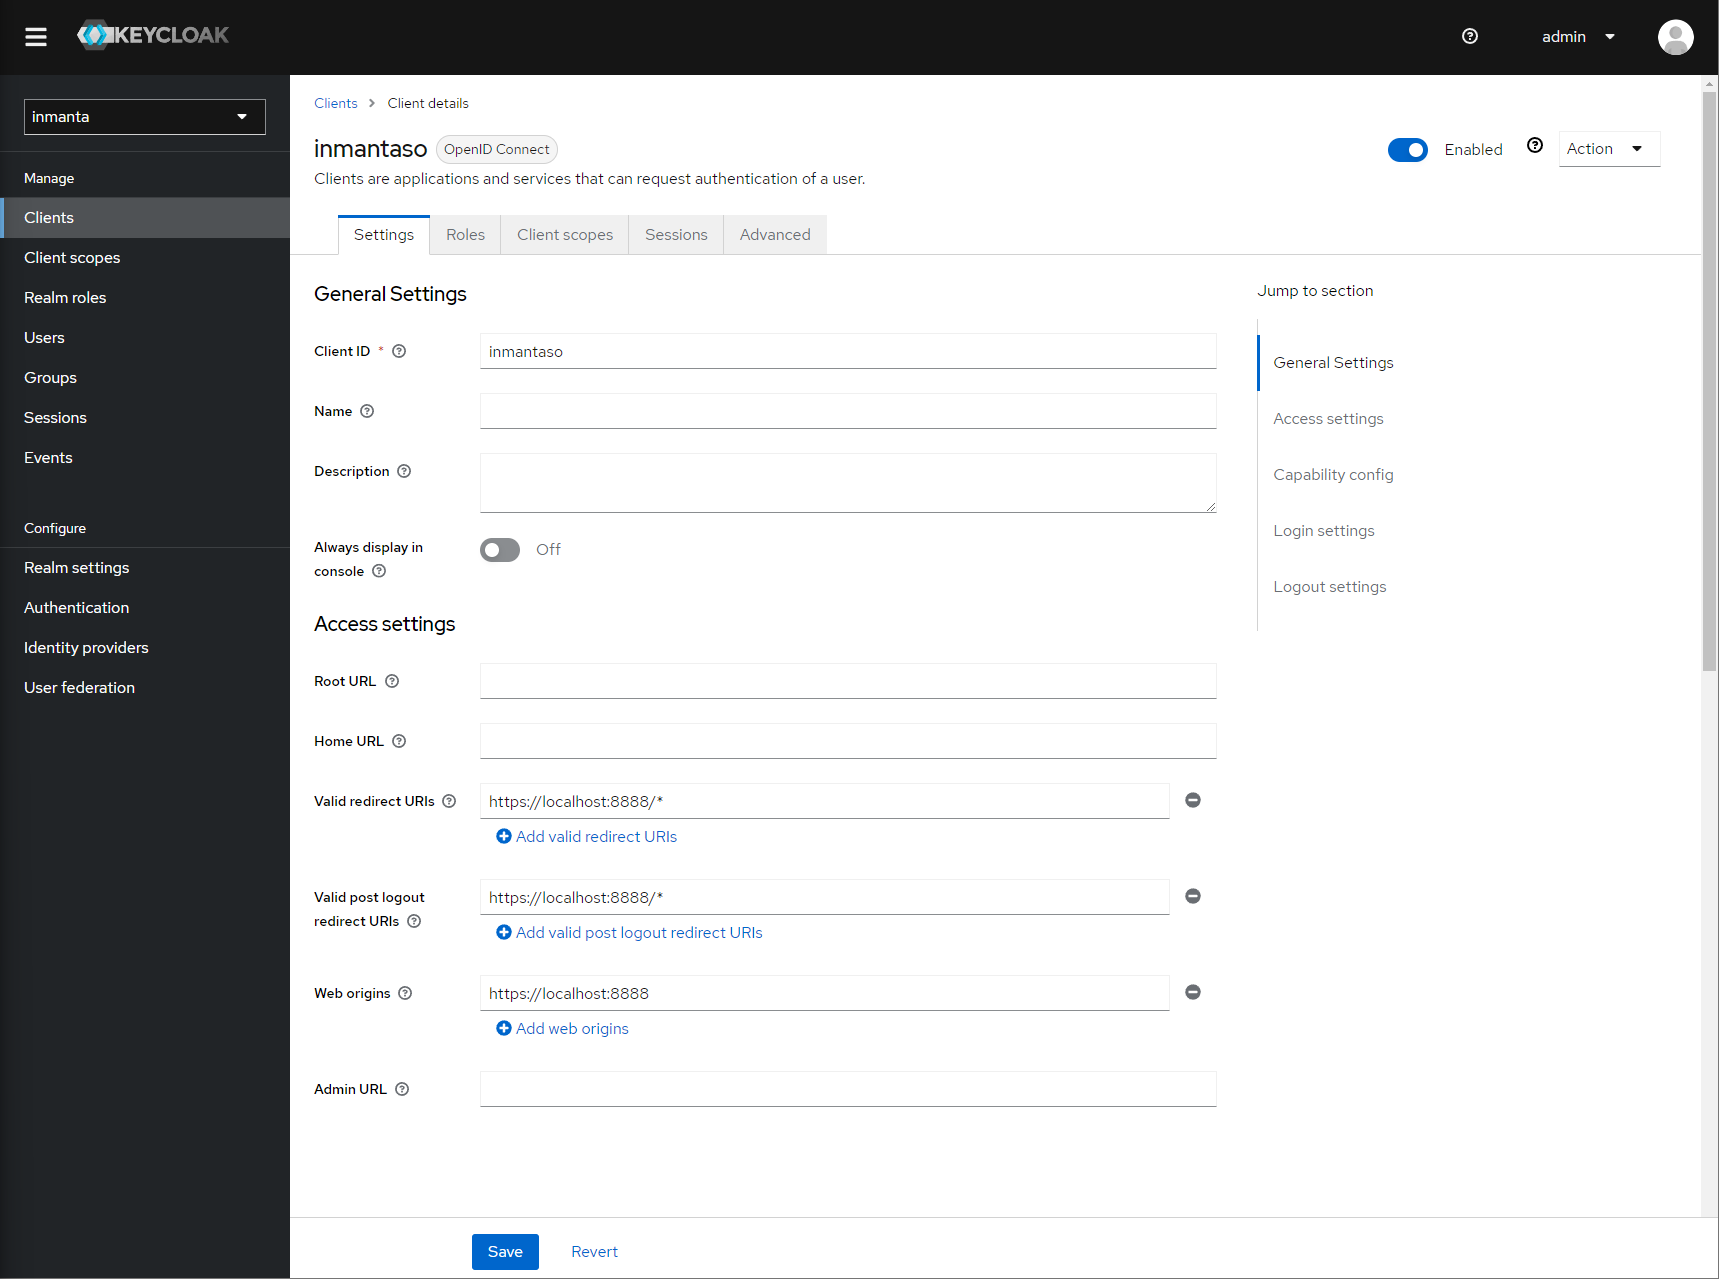
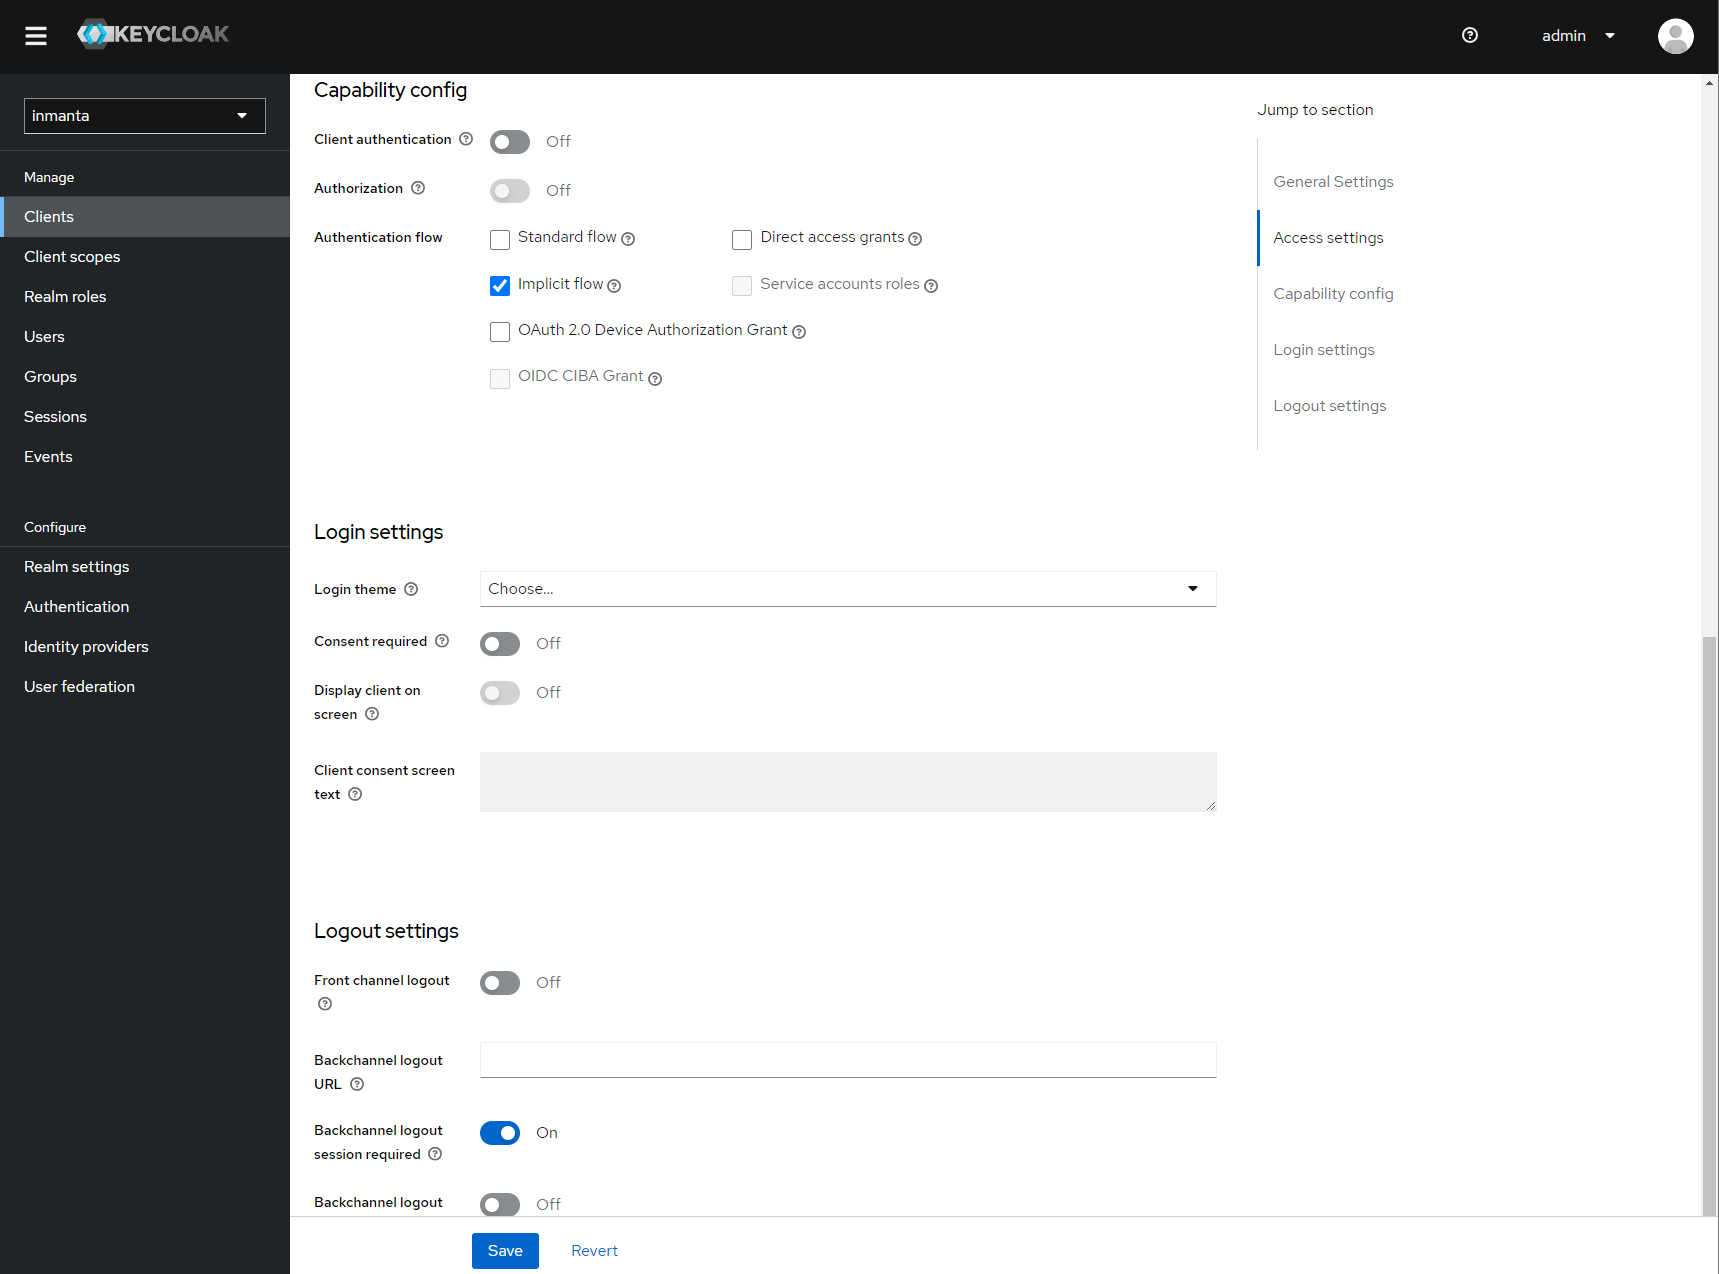
Allow implicit flows (others may be disabled) and configure allowed callback urls of the web-console.#
Go to the client scopes in your Client details.
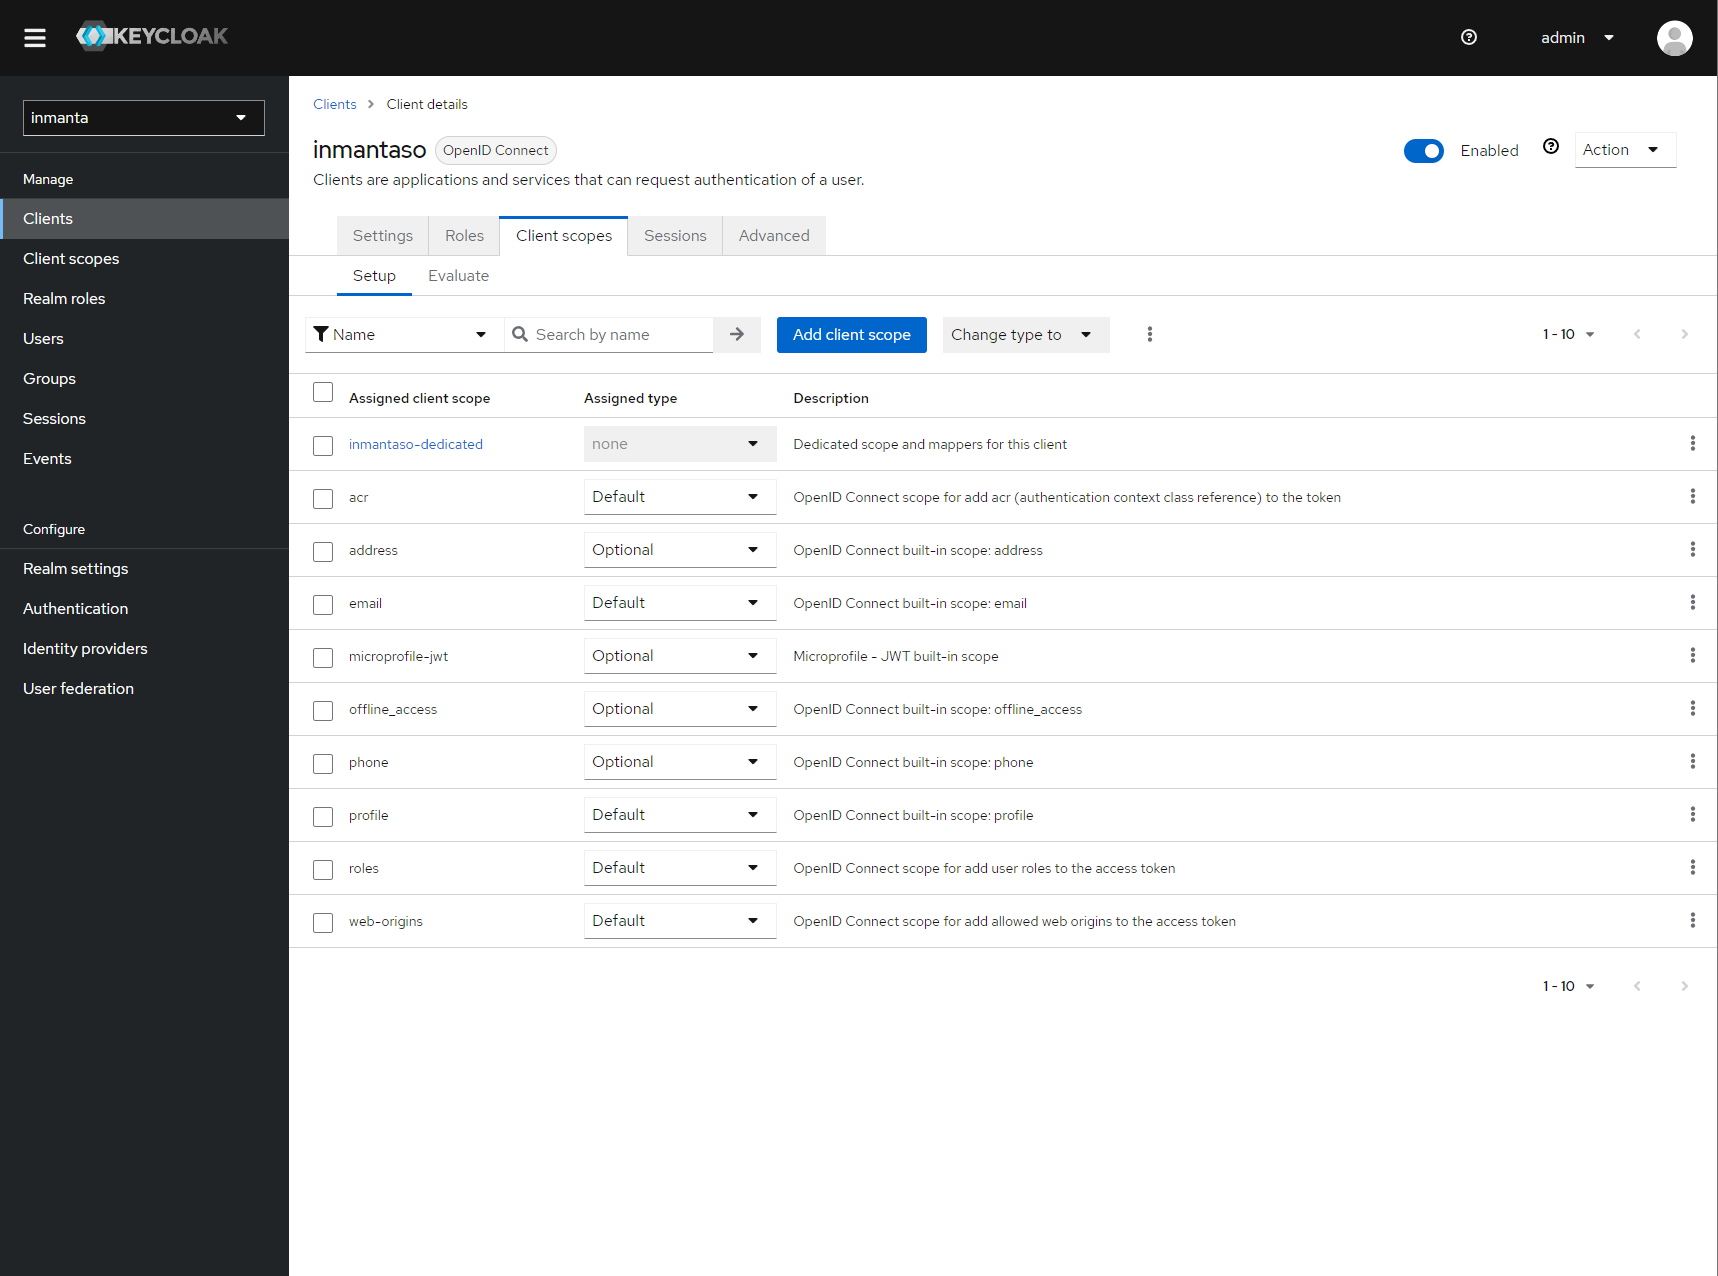
Click on inmantaso-dedicated to edit the dedicated scope and mappers.#
Add a mapper to add custom claims to the issued tokens for the API client type. Click on adding a new mapper and select By Configuration.
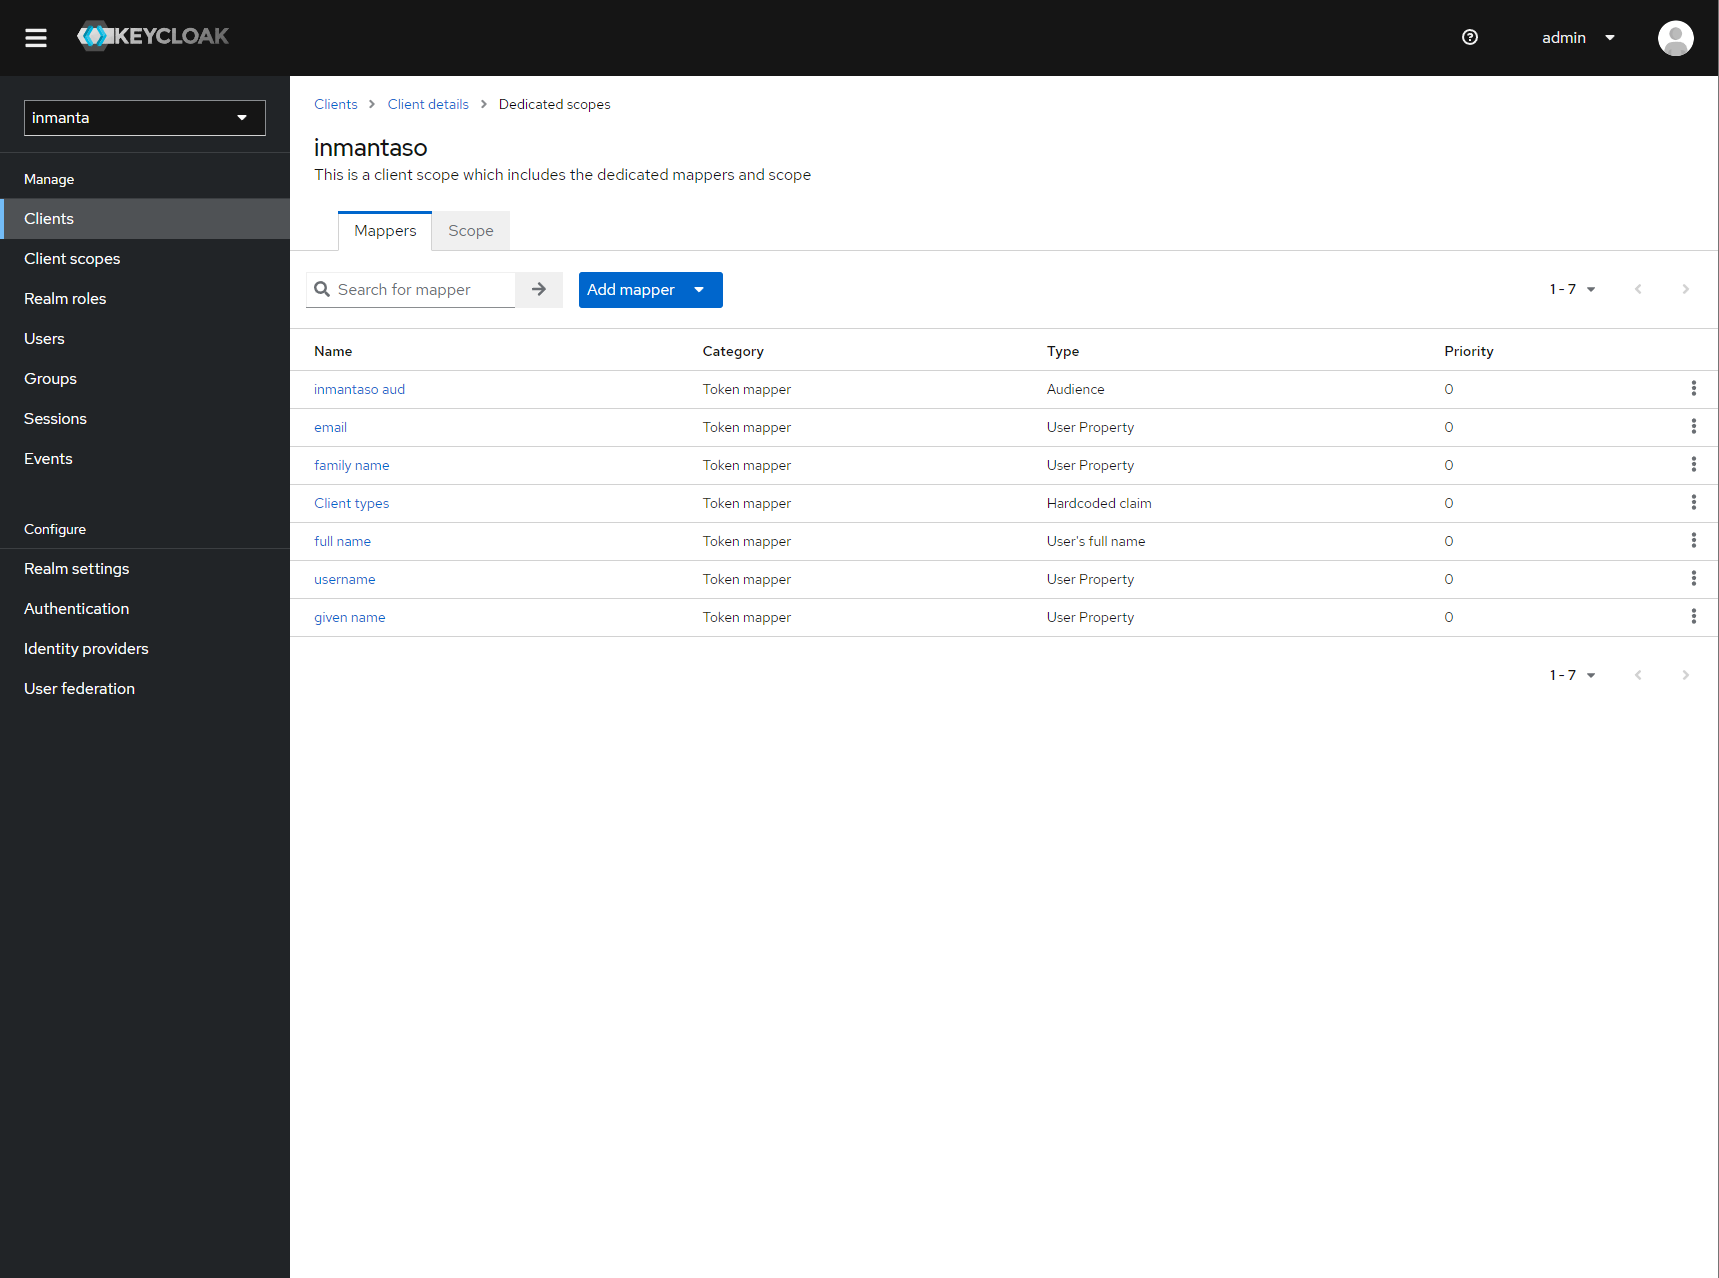
Add a custom mapper to the client to include :urn:inmanta:ct#
Select hardcoded claim, enter :urn:inmanta:ct as claim name and api as claim value and string as type. It should only be
added to the access token.

Add the ct claim to all access tokens for this client.#
Add a second mapper to add inmanta to the audience (only required for Keycloak 4.6 and higher). Click add again as in the previous step.
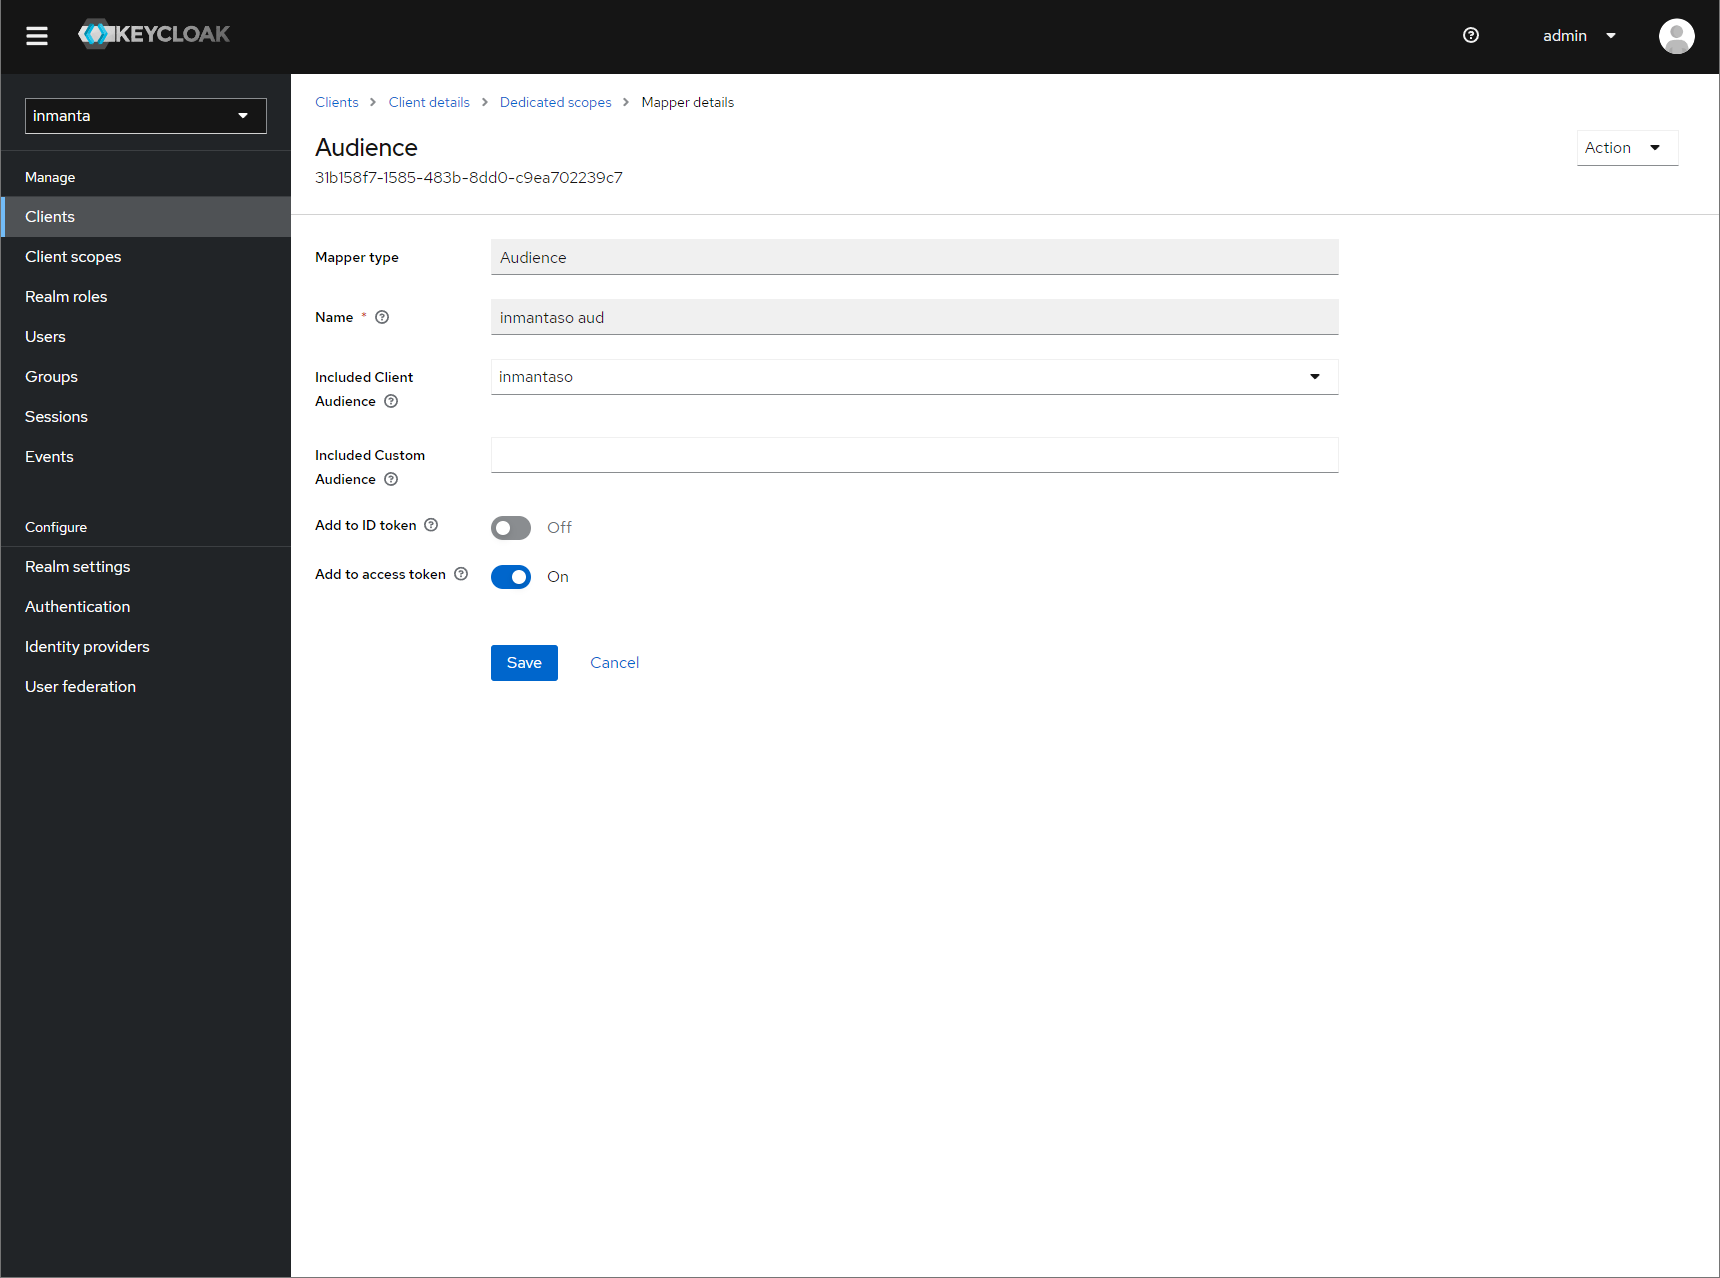
Fill in the following values:
Name: inmanta-audience
Mapper type: Audience
Included Client Audience: inmanta
Add to access token: on
Click save.
Step 3: Configure inmanta server#
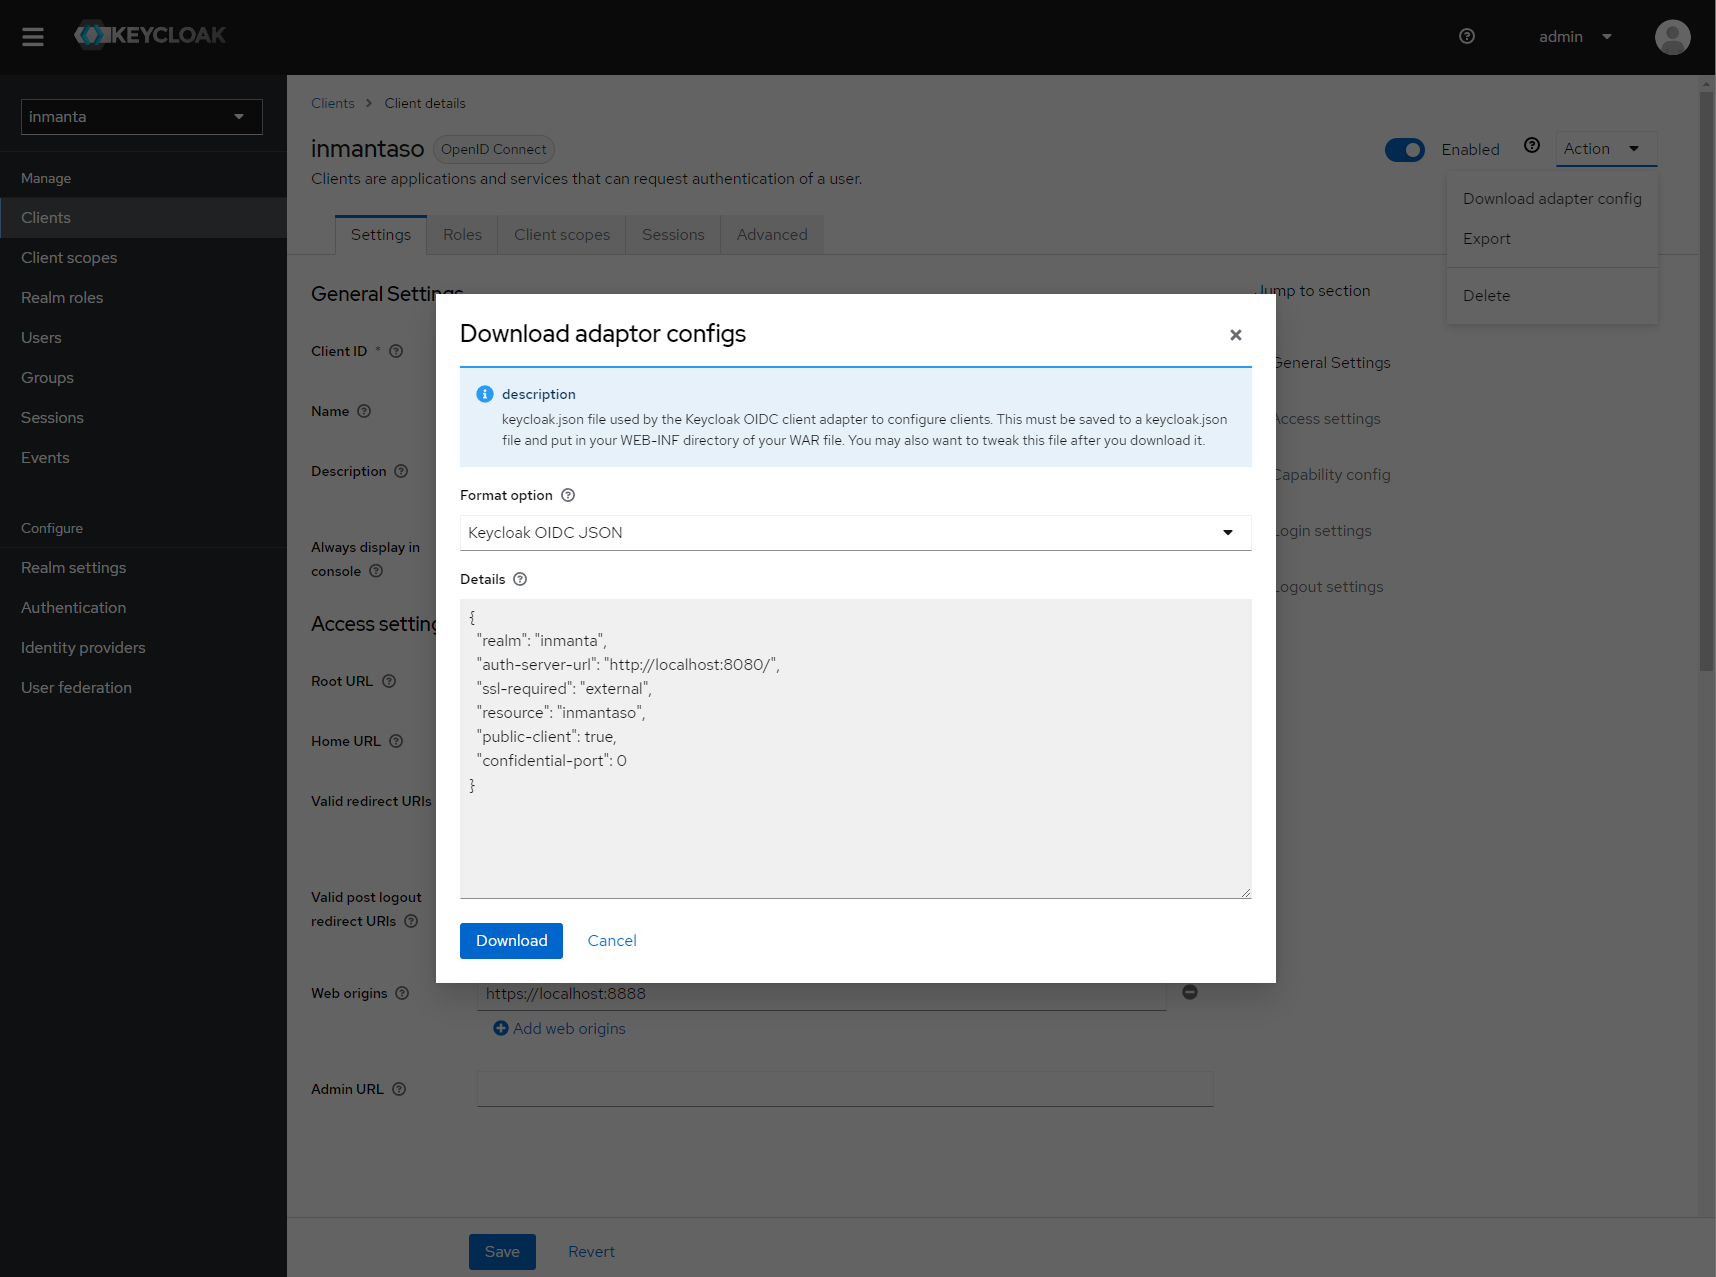
Show the correct configuration parameters in JSON format. (Click on the top right dropdown ‘Action’ and pick ‘Download adapter config’.)#
Select JSON format in the select box. This JSON string provides you with the details to configure the server correctly to redirect web-console users to this keycloak instance and to validate the tokens issued by keycloak.
Add the keycloak configuration parameters to the web-ui section of the server configuration file. Add a configuration file called /etc/inmanta/inmanta.d/keycloak.cfg. Add the oidc_realm, oidc_auth_url and oidc_client_id to the web-ui section. Use the parameters from the installation json file created by keycloak.
[web-ui]
# generic OpenID connect configuration
oidc_realm=inmanta
oidc_auth_url=http://localhost:8080
oidc_client_id=inmantaso
Warning
In a real setup, the url should contain public names instead of localhost, otherwise logins will only work on the machine that hosts inmanta server.
Configure a auth_jwt_ block (for example auth_jwt_keycloak) and configure it to validate the tokens keycloak issues.
[server]
auth=true

[auth_jwt_keycloak]
algorithm=RS256
sign=false
client_types=api
issuer=http://localhost:8080/realms/inmanta
audience=inmantaso
jwks_uri=http://keycloak:8080/realms/inmanta/protocol/openid-connect/certs
validate_cert=false
Set the algorithm to RS256, sign should be false and client_types should be limited to api only. Next set the issuer to the correct value (watch out for the realm). Set the audience to the value of the resource key in the json file. Finally, set the jwks_uri so the server knows how to fetch the public keys to verify the signature on the tokens. (inmanta server needs to be able to access this url).
Both the correct url for the issuer and the jwks_uri is also defined in the openid-configuration endpoint of keycloack. For the examples above this url is http://localhost:8080/realms/inmanta/.well-known/openid-configuration (https://www.keycloak.org/docs/latest/securing_apps/index.html#endpoints)
Warning
When the certificate of keycloak is not trusted by the system on which inmanta is installed, set validate_cert
to false in the auth_jwt_keycloak block for keycloak.